

$20,000 From ONE Web Page
Take a look at the screenshot, in a few weeks I’ll be showing you how I do it.
")
How One Video Dominated Google For John Thornhill Coaching
Hello everyone, and welcome to a fairly overdue blog post!
This week I’m going to show you how a spoof video I created a couple of weeks ago helped me to dominate the 1st page of Google results for a particular search term.
It all started around a month ago when John Thornhill (the eBuwk guy with the funny accent!) asked me if I’d like to promote his coaching program, having worked with him countless times in the past I agreed and started to plan out what I could do to promote it for him.
The most obvious answer, and this I’m sure is what most people would do, is to simply write out some email copy and then send it off to you guys. I would no doubt make a few sales that way, but once the initial mail had been sent, the sales would stop after a few days and I’d have no more sales coming in after that, so I needed to come up with a plan to get a steady flow of on-going sales.
I decided I would first purchase a domain that was related to the search term, and then I’d do a spoof “expose” on the coaching program, providing visitors with an idea of what they would receive when they signed up for the John Thornhill Coaching Program. Central to this page would be a spoof video, and the spoof video wouldn’t just be to provide content on the page….
Before we go any further, here’s the video I created:
Edit: I’ve just noticed that after publishing this post, all the traffic seems to have crashed the Viddler video above, so in the meantime here’s a Youtube link to the video:
http://uk.youtube.com/watch?v=Ct_EAaRs_z8
I’m fully aware that the video is incredibly stupid, but it does the job it’s supposed to. It grabs the viewers attention with the kids voice at the start, and then the crazy Irish lady (Disclaimer: not all Irish people are crazy ;-)), it almost makes you want to keep watching to see what stupidity is going to come next!
I then provide them with a small bit of content, showing the viewer a brief glimpse of the coaching members area, and explaining what they can expect to achieve if they decide to take up the coaching offer. Just as I’m about to reveal the week by week information, I get cut off “By John”, and you are urged to head on over to the site to view the rest of the “expose”.
You’ll also notice that I leave the URL of my webpage on the screen for quite a long time at the end of the video, a lot of people when creating videos, leave the URL on screen for a few seconds and then it’s goes away. The URL at the end of the video is the most important thing, so make sure you give the viewer time to read it!
With the video out of the way, take a look at the screenshots below, they show you the search results for “John Thornhill Coaching” on both Google.com and Google.co.uk. Take a look at how many of the results on page 1 are mine, there are even 4 people paying for Google Adwords ad’s, and I’m out-ranking them with my stupid video!
Here is the first page of Google.com

And here is the first page of Google.co.uk

So now you want to know how I did it?
I actually showed John what I was doing and he said I should document it (as I’m doing now) and then sell it as a $7 report. And as I’m writing this the thought is still crossing my mind, should I give you the information for free or should I charge for it?
You are lucky I’m in a good mood, so I’ll continue with the freebie. If you do feel like giving me a little reward, do check out the “My Offers” category of this blog and see if there is anything on there that takes your fancy!
So, the first thing I needed to do was submit the video I created to a number of different video sites, believe it or not there are actually other video sites out there besides Youtube and Google video.
So I used a service called HeySpread – not an affiliate link, what’s wrong with me today!? 🙂
For around $1 they’ll submit your video to around 20 video directories for you, well worth the very small price you pay if you ask me. With the video is a description explaining what the video is about, and of course, the obligatory link back to my John Thornhill Coaching “Expose” page.
As each video gets added to the video site, it gets crawled by Google and the page gets indexed. In some cases it also indexes the link back to my site – each from a different IP address.
Finally, I “Dugg” both the Youtube video, as well as my “expose” page, again some more back links from different IP addresses.
Not too difficult was it?
With the video, and the landing page I now take up 6 out of the top 10 positions on Google for my search term, and I’d like to bet it will be 7 out of 10 when this article gets indexed.
That’s all for today, but before I go, it would be rude not to point you in the direction of my John Thornhill Expose landing page so you can see what all the fuss is about!
You know the drill by now, any questions, leave a comment, and so on 🙂
Cheers,
Dan
How To Stop People From Copying & Editing Your eBooks

I spent some time last week testing out some new PDF software, and if it was any good, I was going to share it with you.
Well….it was good!
And it’s something that I get asked about a lot, so I figured it would probably be useful for a lot of you.
Here is one of the most common PDF related questions I get asked:
“How can I stop people from copying my PDF eBooks?”
My answer is always the same – You can’t add protection to your PDF eBooks unless you use the Adobe Acrobat software, that currently costs around £300 – roughly $600.
So in the end, people just use free PDF converters that don’t have any security features and just hope that nobody out there decides to copy or edit their eBook.
But now when I get asked the question, I’ll be able to give a different answer – I’ll be able to point them to the new software I spent last week testing out – PDF Domination.
PDF Domination contains a standalone PDF Creator software package that runs on any Windows PC (Even Vista!), but unlike other PDF creators, it contains a number of security features. Take a look:
– Password Protect Your PDF Document
– Disable The Ability To Copy/Paste Text
– Disable Printing
– Disable Image Copying
There are also the usual features that you’d expect to see:
– Simple User Interface
– Easily Insert Clickable Links
– Integrated Word Processor (No need to spend hundreds on MS Office!)
– 1 Click PDF Creation
So that’s the software covered, but PDF Domination isn’t just 1 software application. It’s kind of difficult to describe, but it’s like a big all in one package that covers everything you need to know about creating a successful PDF eBook.
Everything from how to find a niche, writing the eBook, setting up the sales funnel, automating/tracking sales and so on.
Now personally, I think you’ll probably already know a lot of that anyway – if you’ve been reading my blog for a while you should be an expert!
But, I do think that the software module of PDF Domination is way to good to miss out on. When you compare the cost of the PDF Domination package ($47) to the cost of Adobe Acrobat ($600), you can see why I hold it in such high regard.
So if you are interested in protecting your PDF eBooks, head on over and check it out:
https://elpassoblog.com/recs/PDF_Domination.php
No worries if it’s not for you, but as a lot of you ask me about it I thought it would be worth a share!
Cheers,
Dan
The Best WordPress Anti Spam Plugin
The question that has been plaguing bloggers since the dawn of time.
How Can I Stop Spam Comments On My WordPress Blog?
Thankfully, there is a dead simple way to stop 99% of all spam comments. I’ve used it on my blog since I launched back in June 2006 and since then I’ve only had to remove a tiny amount of spam comments that made their way past my “Spam Defences”.
At the time of writing this post, my anti-spam plugin has stopped “11,527 Spam Comments.”
I’m sure you’ll agree that’s enough Viagra Spam to…..I’ll leave you to insert your own pun here.
Can you imagine what would have happened if I didn’t have my anti-spam plugin installed? I would have to go through and delete those 11,500+ comments manually.
It also gives me the freedom to leave my comments open, and un-moderated. This let’s me sit back and watch everyone of you comment away in “real time” without you having to wait for me to manually approve your comments.
So now you know how good it is, let me show you how to install it on your own wordpress blog.
First of all you need to know what the plugin is called. It will come as no great surprise for a lot of you, to find out I’m using the “Akismet” plugin. It’s the default anti-spam plugin that comes with all WordPress downloads. (So why don’t you use it!)
I think the thing that puts a lot of people off Akismet is the API key that you need to activate the plugin, but this isn’t nearly as complicated as it sounds. Following the step by step instructions below and spam comments will be a thing of the past!
1. Log into your WordPress admin dashboard and click on “Plugins”.
2. Aksimet comes pre-uploaded with all new WordPress installations so you don’t need to upload anything. Just look down the plugins list, find Aksimet and click on the “Activate” button.

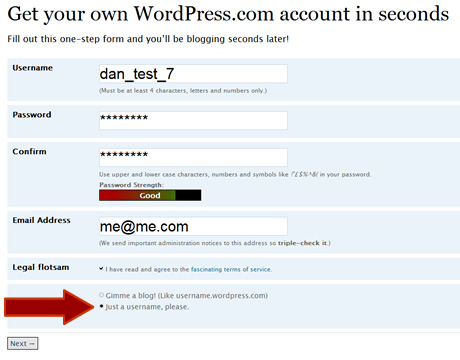
3. You will then see a message like the one in the screen shot below asking you to enter your API key. You probably don’t already have one, so you need to click on the link that takes you to the WordPress.com Sign up page.

4. Fill out the sign up form, and in the last radio button select “Just a username please”. When done click on the “Next” button.
5. You then need to confirm your email address, when you have done that your account has been created and you can log into your WordPress.com dashboard.

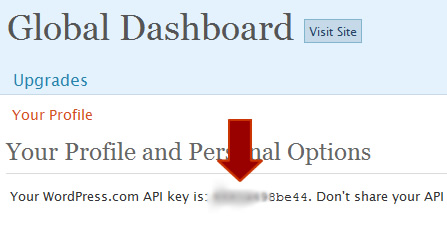
6. Once logged in, click on the “Profile” link to the right of the page. You’ll then be shown your WordPress API key.
7. Now you just need to go back into your own blogs dashboard, click on Plugins > Aksimet and enter your API key in the space provided.
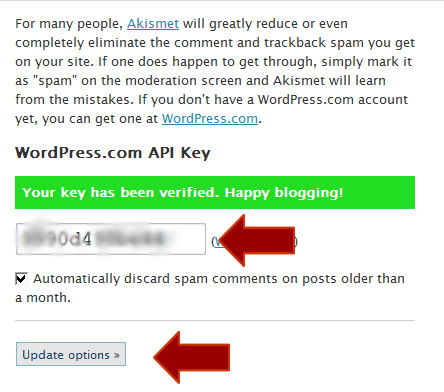
If you have entered the key correctly, you’ll get a nice green success message and the plugin will now be working on your blog. You don’t need to do anything else, you can now sleep easy at night knowing your blog will no longer be subjected to comment spam!
Thanks for reading, and let me know if you have any question.
Regards,
Dan
How To Set Up Google Analytics eCommerce And Goal Tracking
It’s a wet and windy morning here in Yorkshire, which means it is perfect weather for me to write part 2 of my Google Analytics guide. In part 1 I showed you why Google Analytics is so cool, and I gave you some very basic instructions on how to set it up on your website.
In part deux, I’m going to give you a comprehensive step by step guide, showing you how to use Google Analytics to track your e-commerce transactions.
Before I start let me just give you a quick run-down about the different “goals†and e-commerce tracking options, depending on your site some of the guide might not apply to you.
In this example, as well as setting up basic tracking so I can see what the conversion rate for my product is, I’m also going to be setting some goals. Goals can be used for any number of things, you could have a goal set up to see how many visitors sign-up to your newsletter through your opt-in form, or you could use it to see how many people go through your shopping cart and go on to make a purchase.
In my example I’ll be showing you how I use Goals to track how many customers make it through the D9 Hosting shopping cart! Don’t worry if it isn’t making sense, it should all start to come together when you read the guide.
So with that out of the way, let’s get started!
Step 1
This is a nice easy start for you, if you already have an Analytics account then simply log in to your dashboard (admin) area. If you don’t yet have an account then you’ll need to sign-up first – it’s free!
http://www.google.com/analytics/
Step 2
Next we need to create a profile for the website that you wish to generate the stats for. With you now logged into your dashboard, click on the “Add Website Profile†link.

You then need to fill out the small form with the details of your website, it’s all very straightforward but I’ve added a screenshot showing you my settings if you need to use them as a guide.
When you have entered all of the information, click on the “Continue†button.

Step 3
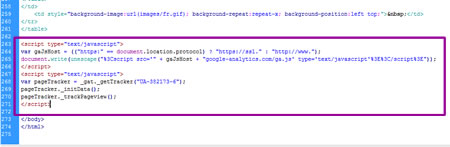
Moving swiftly on to step 3 and one of the most important parts of the process – The Tracking Code!
After clicking on “Continue†in step 2, you will see a screen like the one below:
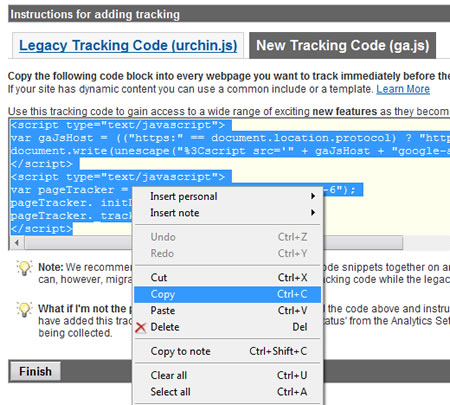
You are presented with 2 types of tracking code, Legacy and New. I prefer using the New tracking code as it helps get your site ready for any future Analytics features that wouldn’t be available if you were using the old code.
So select the new style code, highlight it and “Copy†it to your clipboard. (Right click on the highlighted code and select “Copyâ€)
After you have copied the code, click on the “Finish†button. Don’t worry if you lose the code, you can always retrieve it later!
Step 4
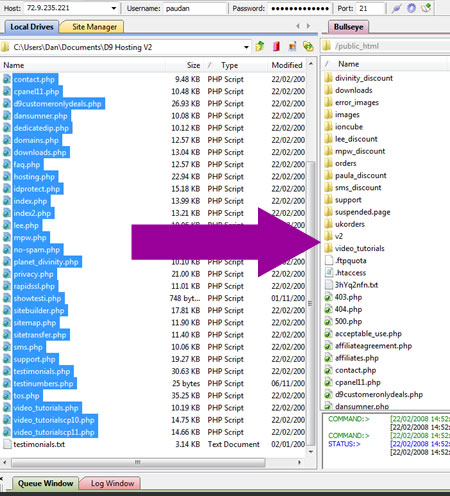
Next we need to add the code that we just copied in Step 3 to EVERY page we wish to track – this should be every page on your website, not just the home page!
You should paste in the code just before your closing </body> tag in your HTML source code.
If you have a site with a lot of pages, you could do a global find/replace and find:
</body>
And replace it with:
**The google tracking code here** </body>When you have added the tracking code to all of your pages, you then need to upload the pages to your web space.
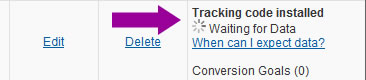
If you then go back into your Google Analytics account and look at the Status of your tracking code, you should see a “Tracking code installed†message next to your website profile. If you don’t see this message try again in a few minutes, if you still see errors after a few minutes you need to double check you have pasted the tracking code into your pages correctly.
Step 5
With the tracking code installed, we need to then tell Analytics that our site is an e-commerce website and that we wish to track sales and conversion rates!
To do this, click on the “Edit†link that appears next to your website profile.
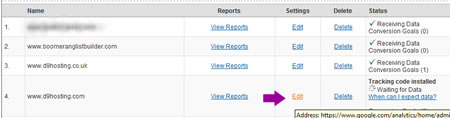
You will then see a set of e-commerce options that you can edit, make sure you select “Yes, this is an e-commerce website†and that you select the correct currency that your site sells items in.
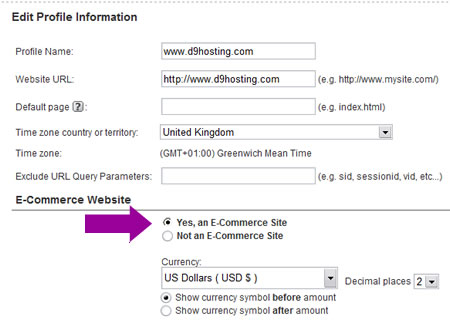
When you are done, click on finish.
Step 6
I am now moving onto “Goalsâ€. If you only have a 1 page website and just want to track sales, you can skip to part 7!
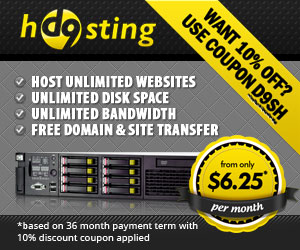
In this example I’m setting up Analytics for www.d9hosting.com
One of the things I wish to track is the effectiveness of the shopping cart. The cart is made up of multiple stages, part 1 you select the hosting package, part 2 you select the domain name and so on.
Setting up goals allows me to track visitors as they go through the different steps, it also shows me if the abandon the cart, and at which point they abandon. If a lot of people abandon the cart at the same stage, I know there is a problem and I need to take a closer look!
So now you know why I’m setting up the goal, here’s how you do it:
Find the “Goals†section for your website profile, and click on the “Edit†button:
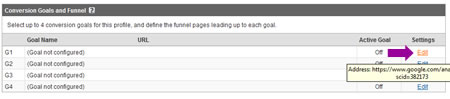
You will then be presented with a screen asking you to input your goal details.
To save typing out everything here, I’ve taken a screen shot showing you how I set up my goals for my hosting shopping cart:
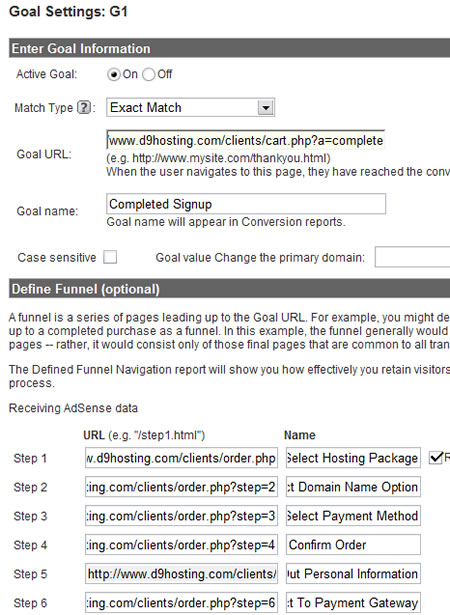
Your funnel URL’s will obviously be different to mine but as long as you get the URL’s in the correct order you shouldn’t have any problems!
You can also make things easier by not defining a funnel at all. This would be useful if you wanted to track newsletter sign-ups. You would just set the “Completed Goal†URL as:
http://www.yoursite.com/Thankyouforjoining.htm (Or whatever your opt-in success page is called!)
When you are happy with the settings, click on the Finish button and you are done, wasn’t so bad was it?
Step 7
The final step for setting up e-commerce tracking is to add some extra code to our “Thankyou†or “Download†page, in simple terms this is the page that the users gets sent to after they purchase your item/s.
You should already have the default tracking code installed on this page, but you also need to add an extra bit of code, this allows you to enter the sale amount, the order ID and so on.
You can see full details here:
http://www.google.com/support/googleanalytics/bin/answer.py?hl=en&answer=55528
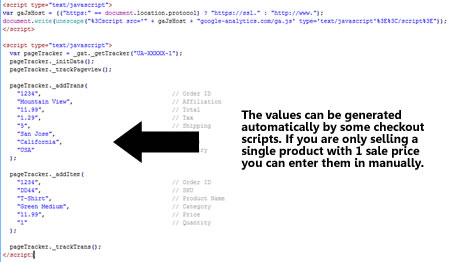
But in short, you just need to add the following code under the “pageTracker._trackPageview();†line of the default code:
pageTracker._addTrans( “1234”, // Order ID”Mountain View”, // Affiliation
“11.99”, // Total
“1.29”, // Tax
“5”, // Shipping
“San Jose”, // City
“California”, // State
“USA” // Country
);
pageTracker._addItem(
“1234”, // Order ID
“DD44”, // SKU
“T-Shirt”, // Product Name
“Green Medium”, // Category
“11.99”, // Price
“1” // Quantity
);
pageTracker._trackTrans();
*Please don’t copy/paste the above code, copy it from Google instead. WordPress tends to make a mess when you copy/paste code.
Your final code should look like the code on the Google page here:
http://www.google.com/support/googleanalytics/bin/answer.py?hl=en&answer=55528
If you are only selling 1 product then you can enter the values manually, if you are using a shopping cart you should be able to use it to pass the details into the Analytics tracking code. Please contact your script vendor if you are unsure about how to do this.
That brings to an end this guide, Analytics usually takes around 24 hours to update so you’ll have to wait until this time tomorrow to see your results, but once you have everything set up correctly it’s a great resource for any webmaster to use!
Thanks for reading, and I hope you have found it useful.
Let me know if you have any questions,
Regards,
Dan
Receive FREE Email Updates, according to one reader it's....
"Better Than A Poke In
The Eye With A Sharp Stick"
Currently Enjoy This Blog More Than Christmas.
Follow Me Via RSS!

Subscribe to this site's RSS feed.