

How To Set Up Google Analytics eCommerce And Goal Tracking
It’s a wet and windy morning here in Yorkshire, which means it is perfect weather for me to write part 2 of my Google Analytics guide. In part 1 I showed you why Google Analytics is so cool, and I gave you some very basic instructions on how to set it up on your website.
In part deux, I’m going to give you a comprehensive step by step guide, showing you how to use Google Analytics to track your e-commerce transactions.
Before I start let me just give you a quick run-down about the different “goals†and e-commerce tracking options, depending on your site some of the guide might not apply to you.
In this example, as well as setting up basic tracking so I can see what the conversion rate for my product is, I’m also going to be setting some goals. Goals can be used for any number of things, you could have a goal set up to see how many visitors sign-up to your newsletter through your opt-in form, or you could use it to see how many people go through your shopping cart and go on to make a purchase.
In my example I’ll be showing you how I use Goals to track how many customers make it through the D9 Hosting shopping cart! Don’t worry if it isn’t making sense, it should all start to come together when you read the guide.
So with that out of the way, let’s get started!
Step 1
This is a nice easy start for you, if you already have an Analytics account then simply log in to your dashboard (admin) area. If you don’t yet have an account then you’ll need to sign-up first – it’s free!
http://www.google.com/analytics/
Step 2
Next we need to create a profile for the website that you wish to generate the stats for. With you now logged into your dashboard, click on the “Add Website Profile†link.

You then need to fill out the small form with the details of your website, it’s all very straightforward but I’ve added a screenshot showing you my settings if you need to use them as a guide.
When you have entered all of the information, click on the “Continue†button.

Step 3
Moving swiftly on to step 3 and one of the most important parts of the process – The Tracking Code!
After clicking on “Continue†in step 2, you will see a screen like the one below:
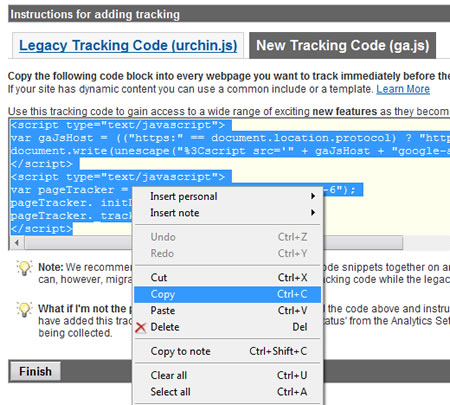
You are presented with 2 types of tracking code, Legacy and New. I prefer using the New tracking code as it helps get your site ready for any future Analytics features that wouldn’t be available if you were using the old code.
So select the new style code, highlight it and “Copy†it to your clipboard. (Right click on the highlighted code and select “Copyâ€)
After you have copied the code, click on the “Finish†button. Don’t worry if you lose the code, you can always retrieve it later!
Step 4
Next we need to add the code that we just copied in Step 3 to EVERY page we wish to track – this should be every page on your website, not just the home page!
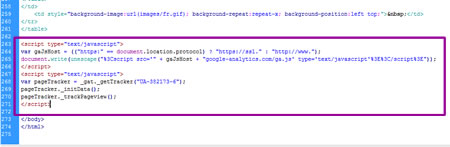
You should paste in the code just before your closing </body> tag in your HTML source code.
If you have a site with a lot of pages, you could do a global find/replace and find:
</body>
And replace it with:
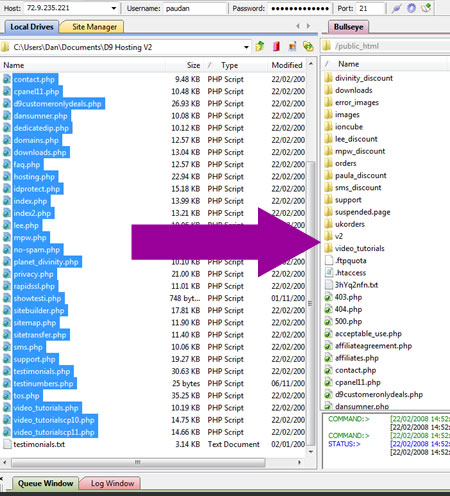
**The google tracking code here** </body>When you have added the tracking code to all of your pages, you then need to upload the pages to your web space.
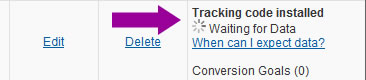
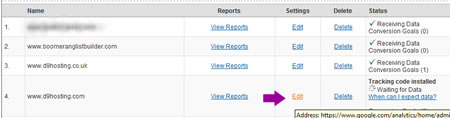
If you then go back into your Google Analytics account and look at the Status of your tracking code, you should see a “Tracking code installed†message next to your website profile. If you don’t see this message try again in a few minutes, if you still see errors after a few minutes you need to double check you have pasted the tracking code into your pages correctly.
Step 5
With the tracking code installed, we need to then tell Analytics that our site is an e-commerce website and that we wish to track sales and conversion rates!
To do this, click on the “Edit†link that appears next to your website profile.
You will then see a set of e-commerce options that you can edit, make sure you select “Yes, this is an e-commerce website†and that you select the correct currency that your site sells items in.
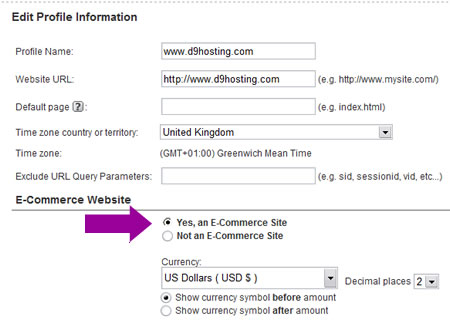
When you are done, click on finish.
Step 6
I am now moving onto “Goalsâ€. If you only have a 1 page website and just want to track sales, you can skip to part 7!
In this example I’m setting up Analytics for www.d9hosting.com
One of the things I wish to track is the effectiveness of the shopping cart. The cart is made up of multiple stages, part 1 you select the hosting package, part 2 you select the domain name and so on.
Setting up goals allows me to track visitors as they go through the different steps, it also shows me if the abandon the cart, and at which point they abandon. If a lot of people abandon the cart at the same stage, I know there is a problem and I need to take a closer look!
So now you know why I’m setting up the goal, here’s how you do it:
Find the “Goals†section for your website profile, and click on the “Edit†button:
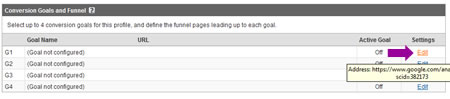
You will then be presented with a screen asking you to input your goal details.
To save typing out everything here, I’ve taken a screen shot showing you how I set up my goals for my hosting shopping cart:
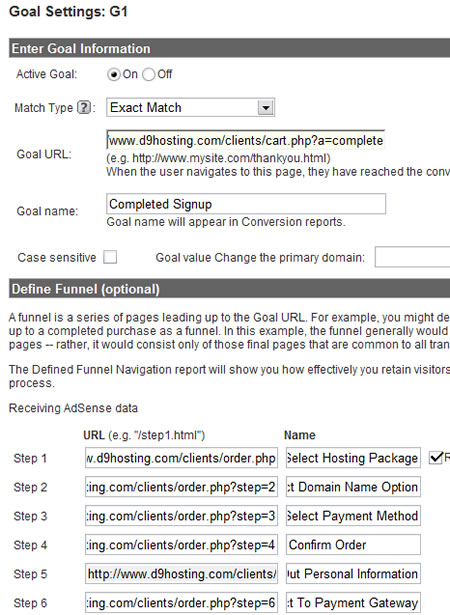
Your funnel URL’s will obviously be different to mine but as long as you get the URL’s in the correct order you shouldn’t have any problems!
You can also make things easier by not defining a funnel at all. This would be useful if you wanted to track newsletter sign-ups. You would just set the “Completed Goal†URL as:
http://www.yoursite.com/Thankyouforjoining.htm (Or whatever your opt-in success page is called!)
When you are happy with the settings, click on the Finish button and you are done, wasn’t so bad was it?
Step 7
The final step for setting up e-commerce tracking is to add some extra code to our “Thankyou†or “Download†page, in simple terms this is the page that the users gets sent to after they purchase your item/s.
You should already have the default tracking code installed on this page, but you also need to add an extra bit of code, this allows you to enter the sale amount, the order ID and so on.
You can see full details here:
http://www.google.com/support/googleanalytics/bin/answer.py?hl=en&answer=55528
But in short, you just need to add the following code under the “pageTracker._trackPageview();†line of the default code:
pageTracker._addTrans( “1234”, // Order ID”Mountain View”, // Affiliation
“11.99”, // Total
“1.29”, // Tax
“5”, // Shipping
“San Jose”, // City
“California”, // State
“USA” // Country
);
pageTracker._addItem(
“1234”, // Order ID
“DD44”, // SKU
“T-Shirt”, // Product Name
“Green Medium”, // Category
“11.99”, // Price
“1” // Quantity
);
pageTracker._trackTrans();
*Please don’t copy/paste the above code, copy it from Google instead. WordPress tends to make a mess when you copy/paste code.
Your final code should look like the code on the Google page here:
http://www.google.com/support/googleanalytics/bin/answer.py?hl=en&answer=55528
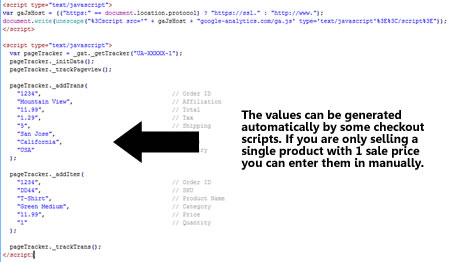
If you are only selling 1 product then you can enter the values manually, if you are using a shopping cart you should be able to use it to pass the details into the Analytics tracking code. Please contact your script vendor if you are unsure about how to do this.
That brings to an end this guide, Analytics usually takes around 24 hours to update so you’ll have to wait until this time tomorrow to see your results, but once you have everything set up correctly it’s a great resource for any webmaster to use!
Thanks for reading, and I hope you have found it useful.
Let me know if you have any questions,
Regards,
Dan
Receive FREE Email Updates, according to one reader it's....
"Better Than A Poke In
The Eye With A Sharp Stick"
Currently Enjoy This Blog More Than Christmas.

Follow Me Via RSS!

Subscribe to this site's RSS feed.