

How To Keep Your Website Secure
This is a belated follow on to my last blog post – How To Keep Your Computer Secure
This was supposed to be posted a couple of weeks ago, but it’s the start of lambing time so I’m fairly tied up with that at present, I have however found a spare hour this morning to write this blog post.
As a web host (amongst other things), we deal with hacked accounts on a daily basis, anyone that’s ever fallen victim to this knows how much of a pain it can be to get a website back to normal after it’s been infected. So here are a few steps you can use to help prevent the hackers getting access in the first place!
1. Keep Your Scripts Up To Date
This is the most common way for a hacker to gain access to your account, all it takes is one line of poorly written code and kablamo, the hacker can inject malicious code into your files.
That’s why it’s vital to keep everything up to date, script updates don’t just contain new features, but they also contain important security fixes.
Open source scripts such as Joomla, WordPress and OSCommerce are particularly vulnerable, as the code is, as the name suggests, open source, so the hackers have access to all of the code, making it very easy for them to go through to find anything that’s been badly written. Once a weakness is found, it spreads like wildfire across the message boards and leads to more infected websites.
So please, as soon as you see a new update available for any scripts you are using – download and install them, it’ll save you a lot of problems in the long run.
2. Remove Unused Scripts!
It seems obvious, but I know a lot of you don’t do it. (tut tut)
As I said before, all it takes is one line of badly written code for hackers to gain access to your account, so the more code you have uploaded, the more chance you have of being hacked.
It doesn’t matter if the code is uploaded to some obscure place, or to a site that is no longer online, if the code exists on your site the hackers will find it, so if you have any old scripts on your account that you are no longer using, delete them, leaving them on the account is asking for trouble.
3. Do You Really Need That Plugin?
As well as removing unused scripts, it would be a good idea to go through the scripts that you do use and get rid of anything on there that isn’t a fundamental part of your site.
Take WordPress plugins for example, if you have a WordPress blog, go into the admin area and click on “Plugins”, and I’d like to bet there are a lot of inactive plugins on there, why?
If you aren’t using a plugin, delete it from your webspace, all it’s doing is sitting there waiting for someone to find it so make sure you get rid of any un-used plugins and themes, don’t make it easy for them 🙂
4. Use SFTP
SFTP stands for Secure File Transfer Protocol and works in the same way as standard FTP, but with SFTP all commands and data are encrypted.
Here’s a graphical example of Pete the packet sniffer stealing your FTP password “sexybeast4321”:

As you can see, the password is sent in plan text, meaning Pete now has your password.
Now compare that to if you were using SFTP:

You can see that the password is now encrypted, meaning Pete can’t get access to your details.
So, How Do You Use SFTP?
Most FTP clients now support SFTP, and it’s just a case of selecting SFTP as the protocol instead of standard FTP, here’s what it looks like in CuteFTP Pro:

There are bazillions of FTP clients out there, so it’s impossible for me to show you how to set it up in every one of them, so if you just look in the help files for your FTP client and do a search for “SFTP” you should be able to find what you need, and as always, Google is your friend for things like this.
One final thing you’ll need to know if the SSH/SFTP port of your web server, to find this you can either contact your host, or if you are using a cPanel based account, log into your cPanel, click on “FTP Accounts” > “Configure FTP Client” and you’ll see the port listed on that page.
If you follow those 4 steps you should minimize the risk of your account being hacked, it wont turn your account into Alcatraz, but it will go a long way to securing it. Most of it is down to regular maintenance of your scripts, SFTP helps add an extra level of security but if you have insecure scripts on there, it’ll do no good.
There’s also the obvious things like changing your cPanel/FTP password at regular intervals, but I’m sure you all do that anyway 😉
Even after this, there’s still a chance of getting hacked, so what do you do if you get hacked?
Contact Your Host
It may be possible to restore your account from a backup, so contacting your host right away is a good course of action, if they can restore to a point before the hacking, it gives you time to go in and clean up the old scripts that allowed the hackers to gain access.
If there are no clean backups available, then unfortunately there’s nothing for it but to clean out the infected files manually. If you have a copy of your sites on your computer (which you really should have), you may find it quicker to delete the site on your web space and re-upload from the copy on your computer.
You should also take into account that when hackers do get access to your site, they won’t just infect the website they gained the access to, they’ll infect everything on your account. So even if you have 1 bad WordPress installation and 10 good, the 10 good will be infected as well.
So to minimize this you can get yourself a reseller account and run each domain on it’s own cPanel, meaning if a site does get hacked, you only have 1 site to clean up, not every site you’ll ever run. In general you’ll find reseller accounts are only a few dollars more than what you are currently paying so it’s well worth the upgrade, if only for the piece of mind it’ll bring you.
I think that covers everything, I hope I haven’t scared you too much 🙂
If you have any questions, or any other security measures that you use, please feel free to bombard the comments section.
Regards,
Dan
How To Edit Your WordPress Blog Theme
Hello everyone, today I’ll cover a subject that has been requested by a lot of you for a very long time. So I’ve decided to get my screen shot head on and give you what I believe to be a pretty comprehensive guide on how to edit your WordPress blog theme.
Before you start reading this guide, please ensure that you make a backup of any files BEFORE you modify them, if you don’t make a backup and then mess up your theme you will be in a bit of a pickle 😉
So, I don’t think we need any more of an introduction so lets make like Abi Titmuss and get on with it.
Step 1
The first thing you need to do is to decide what it is that you want to edit; do you want to add an email opt-in box to the sidebar, or would you like to customize the comments section?
It doesn’t matter what part of the blog you wish to edit, you’d start off in the same way. The first thing you need to do is to log into your WordPress admin area and go into the “Theme Editor”. You can find this down the left hand side of the page.

Step 2
Next you will be able to see a screen that looks similar to the image below:

In the main part of the screen you’ll be able to see a big white box with some sexy code in it, and to the right of the page you’ll see a list of all files that make up your WordPress theme. Each file controls a different part of the blog, don’t worry if you have more or less files than in the screen shot above, each theme is different and they will have different files and filenames.
They should however have names that allow you to get a rough idea of which part of the blog the file pertains to.
##############################
Top Quality WordPress Blog Hosting
D9 Hosting offers ultra-reliable WordPress
blog hosting to all customers. Our server
load averages are stable at under 0.50%
on all existing servers!
See What Our Customers Say About Us >>
##############################
Step 3
Now that you know how you can edit the files, you need to check out which file pertains to the part of the blog you wish to edit. With a bit of common sense and trial and error you’ll be able to find it in no time.
In this example I want to edit my sidebar. If you look at my list of files you can see I have two that could pertain to the sidebar – l_sidebar.php and r_sidebar.php

All I’m going to do is click on the l_sidebar.php file, and the file will then be opened in the big white box to the left of the page.

All I am going to do now is enter some random text in the file; for this example I will just type “Hello” and then I will click on the “Update File” button.

Step 4
What you need to do now is visit your blog, and then go on a hunting trip to find the “Hello” that you just entered in the file. When you find the “Hello” on your blog, you can get a visual idea of what you’ve just done:

You can see that “Hello” has appeared at the top of the page. But it’s slightly too high, I want to move it down slightly.
So all I need to do is go back into the theme editor, and back to the l_sidebar.php file. I’m then just going to move the “Hello” down under the <div id=”sidebar”> statement.

Step 5
When you have moved your identifying text (Hello in this example) Â and saved the file, go back to your blog and you’ll notice that the text has moved. In my example it’s slightly lower down the page than it was before:

Once you have done this a few times, you’ll be able to find the ideal place that you want your new content to appear. So all you’d need to do is replace your text (Hello in this example) with your custom content!
So just to go a bit further and show you a bit of customization “in action”, you’ll notice at the bottom of each of my single posts I have box prompting you to join my mailing list:

To add this, I edited the “single.php” file, don’t worry if you don’t have one in your theme. Just have a look around and you’ll be able to find which file pertains to that part of the blog.

I then added the code for the table; which you can see between the 2 blue arrows in the image below and clicked on the “Update” button.

And that, in a nutshell, is how you edit your WordPress blog. It helps if you have a bit of basic coding knowledge as you’ll be able to find which bits to edit a lot quicker, but even if you are a web design newbie you should be able to figure it out with a bit of trial and error.
And just before I go, here’s an added bonus lesson for you –
How To Add An Opt-In Form To The Code Blue Sidebar
Now if you don’t already know, “Code Blue” is the theme that I use for this blog. It’s a very popular theme and is made by IMHO the best WordPress theme designer around Brian Gardner.
A lot of you have asked how I got my opt-in box in the top left, so here’s how to do it.
Step 1
Open up the “l_sidebar.php” file in the WordPress theme editor and look for the <div id = “sidebar”> code, under that we are going to create a new DIV in our stylesheet called “blogupdates”, so enter the following under the sidebar code:
<div id = “blogupdates”>

Step 2
We should really have done this bit first but never mind, we’ll get to the same end point 😉
All you need to do now is create the DIV in your stylesheet, so in your theme editor, open up your stylesheet and add the following code to the bottom of the file:

Save the files when done.
Step 3
Go back into the editor and open up l_sidebar.php
Under the <div id = “blogupdates”> that you just added, you need to enter the code for your opt-in form, and the end of the code close the DIV and you are done!
So it should look like this:
<div id = “blogupdates”>
Opt-in code goes here
</div>
Just a quick note to say please don’t copy/paste any code direct from this blog, WordPress tends to screw up the quotation marks, so you are better off typing out the code manually and not copy/pasting!
And that brings to an end a monster of a blog post, I didn’t know I’d taken so many screen shots, I should have made it into a $7 eBook or something!
As always please leave any comments or questions, I think I’m off for a lay down 😉
The Best WordPress Anti Spam Plugin
The question that has been plaguing bloggers since the dawn of time.
How Can I Stop Spam Comments On My WordPress Blog?
Thankfully, there is a dead simple way to stop 99% of all spam comments. I’ve used it on my blog since I launched back in June 2006 and since then I’ve only had to remove a tiny amount of spam comments that made their way past my “Spam Defences”.
At the time of writing this post, my anti-spam plugin has stopped “11,527 Spam Comments.”
I’m sure you’ll agree that’s enough Viagra Spam to…..I’ll leave you to insert your own pun here.
Can you imagine what would have happened if I didn’t have my anti-spam plugin installed? I would have to go through and delete those 11,500+ comments manually.
It also gives me the freedom to leave my comments open, and un-moderated. This let’s me sit back and watch everyone of you comment away in “real time” without you having to wait for me to manually approve your comments.
So now you know how good it is, let me show you how to install it on your own wordpress blog.
First of all you need to know what the plugin is called. It will come as no great surprise for a lot of you, to find out I’m using the “Akismet” plugin. It’s the default anti-spam plugin that comes with all WordPress downloads. (So why don’t you use it!)
I think the thing that puts a lot of people off Akismet is the API key that you need to activate the plugin, but this isn’t nearly as complicated as it sounds. Following the step by step instructions below and spam comments will be a thing of the past!
1. Log into your WordPress admin dashboard and click on “Plugins”.
2. Aksimet comes pre-uploaded with all new WordPress installations so you don’t need to upload anything. Just look down the plugins list, find Aksimet and click on the “Activate” button.

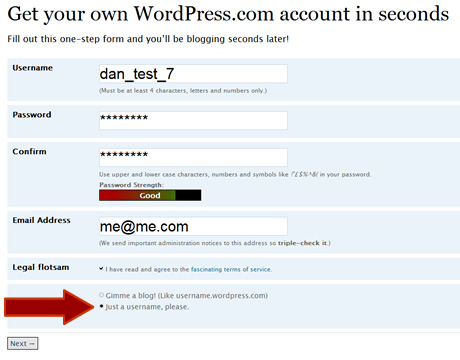
3. You will then see a message like the one in the screen shot below asking you to enter your API key. You probably don’t already have one, so you need to click on the link that takes you to the WordPress.com Sign up page.

4. Fill out the sign up form, and in the last radio button select “Just a username please”. When done click on the “Next” button.
5. You then need to confirm your email address, when you have done that your account has been created and you can log into your WordPress.com dashboard.

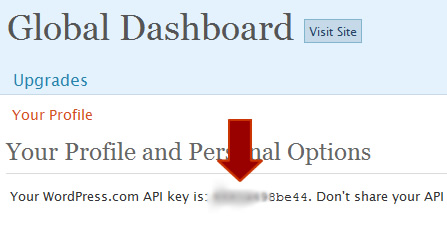
6. Once logged in, click on the “Profile” link to the right of the page. You’ll then be shown your WordPress API key.
7. Now you just need to go back into your own blogs dashboard, click on Plugins > Aksimet and enter your API key in the space provided.
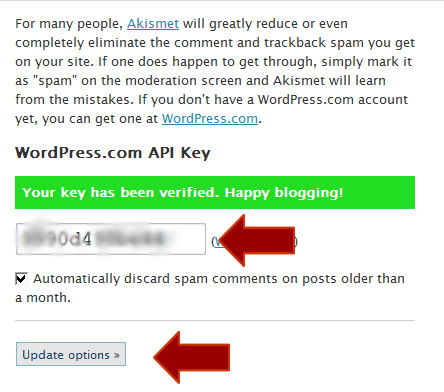
If you have entered the key correctly, you’ll get a nice green success message and the plugin will now be working on your blog. You don’t need to do anything else, you can now sleep easy at night knowing your blog will no longer be subjected to comment spam!
Thanks for reading, and let me know if you have any question.
Regards,
Dan
Why Adding Blog Comments Does Nothing For SEO
Why Adding Blog Comments Does Nothing For SEO
Hello readers, this week I have a double whammy (My spell checker doesn’t like the word but i’m leaving it in!) of articles for you. The first article that you are reading now is about dispelling a myth that leaving comments on WordPress blogs is a good way to get a back-link to your website.
The second article, that you can find underneath this one is about a nasty run in I’ve had with 1&1 Internet and a debt collection agency.
But like all chronological things, we will start at the beginning with the WordPress/SEO article.
I’m sure you have already heard this saying many times but I’ll post it again:
“Get As Many Back-links To Your Site To Improve Your Search Engine Rankingâ€
The above statement is 100% correct, BUT what isn’t correct is when people advise you that the easiest, quickest and cheapest way to get good quality back-links is by posting comments on blogs and entering your website URL. Here’s an example of a comment with a “back-link†made by one of my readers, Omar Martin.
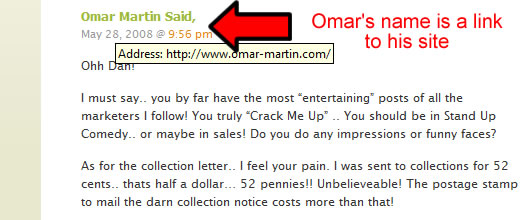
So you’d think that when the Google Bot visited my blog and looked at the comments, the Bot would follow Omar’s link out of the blog and back onto his site. Normally this would be the case, but not with a WordPress blog!
By default, WordPress adds a “nofollow†attribute to the URL’s you enter in your comments. This means that when the search engine bots see your links, they make a wide birth and totally ignore them. Don’t believe me, go look at the source code of a WordPress blog, and you’ll see the “nofollow†attribute, this is an example, again from Omars comment:

So the next time you see somebody saying that adding comments to a WordPress blog is an easy way to get a back-link, give them a slap round the face and send them to this post. Well, maybe don’t do the slap bit, but do feel free to send them to this page.
Despite all of this technical mumbo-jumbo, branding your name with your website link is still a great “Old Fashioned” way to get your website noticed. I don’t know about you, but whenever I read an interesting comment on a blog, more times than not I’ll click on that persons link and check out their site!
Thanks for reading this post, feel free as always to leave a comment – You won’t get a back-link but you will get a nice warm feeling inside! (Allegedly)
Cheers,
Dan
P.S. Next week – How to take off the nofollow attribute!
Receive FREE Email Updates, according to one reader it's....
"Better Than A Poke In
The Eye With A Sharp Stick"
Currently Enjoy This Blog More Than Christmas.

Follow Me Via RSS!

Subscribe to this site's RSS feed.