

Keeping Track Of Your Website Visitors
Keeping Track Of Your Website Visitors
Greetings everyone, welcome to another newsletter. Although why I still call them “Newsletters†is anyone’s guess, I think I’m going to have to rename them to “Mildly interesting postings from a bit of a geek that seem to arrive in your inbox every now and againâ€.
So with that in mind, welcome to my very first mildly interesting post….from a bit of a geek.
In this edition I’ll show you exactly how you can set up a detailed tracking system, without spending a single penny!
Your web host will no doubt already offer you a basic statistics package, this will show you the number of visitors, where they came from, what browser they were using and so on, but like dog with worms, we are hungry for MORE!
We need to know how long the visitor spent on our site, which pages they visited, which pages they left the site on, why did they leave the site, we can even find out the type of internet connection they used when they visited our website.
The reason we need this information, isn’t because we are being greedy, far from it. Let’s take the exit pages as an example. The screen shot below shows you the exit stats for this blog:

It might be a bit difficult for you to see, but it shows every page and the number of people that exited the site when they visited that page. Mine looks fairly normal, but let’s say that you have a page that has a very high exit rate. You can then look at that page in detail to try and find out why people are leaving it, you can then tweak the page until the exit rate goes down!
You can also see how many visitors are “Loyal†to your website. The stats will track a visitor and see if they have visited your site before, take a look at the loyalty stats for this blog, over a 1 month period:
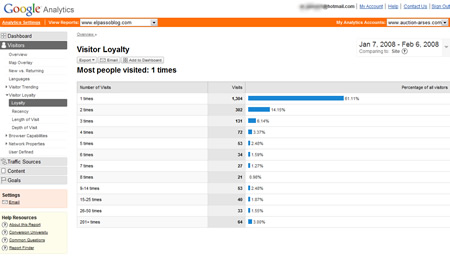
You can see that 60% have only visited the blog once in the past month – shame on you! 😉
But the other 40% have visited the blog at least twice in the past month which for me is a good thing, if you keep coming back then I must be doing something right. As for the 64 people (3%) that visited the blog more than 200 times this month….I have the number of a good psychiatrist (try spelling that without a spell checker) that I can give to you 😉
Another cool thing I like to look at is the amount of time the visitor spends on the site. Another screen shot for you:
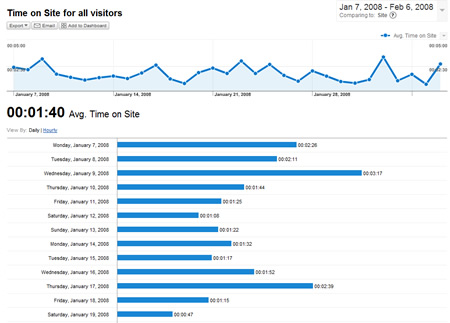
The average time people spend on this blog is currently 1 minute and 40 seconds. This is a very good sign, if people spend more than 10 seconds on your site then they must be interested in the content. If the average time people spend on your site is less than 10 seconds then you need to think about changing something!
Not only does it show me the average time you spend on the site, but it also breaks it down, day by day. On certain days, the average time jumps up to over 3 minutes. It’s no co-incidence that these days are when I make a new “Mildly interesting postâ€, not only does it show me that you are clicking on the link to view the latest post, it also shows that you are actually reading them!
I’ve just reached a full page in my word processor, and I’ haven’t even told you what stats package I’m talking about, and I haven’t shown you how to install it yet. I’m going to jump into that now, I could keep going on about the hundreds of cool features but I’d still be here this time next week.
So, What Is It?
Those of you with eyes will have already seen the name on the screen shots – “Google Analyticsâ€.
You can sign up for Google Analytics (it’s free) at the link below:
http://www.google.com/analytics
When you sign up, the first thing you need to do is set up a new website profile. Click on the “Create new profile†button and it will ask you for details of your site, fill out the form and you will be done in no time.
All you need to do then is copy/paste the tracking code onto the pages you wish google to track for you. If you are using a WordPress blog like this one, you just need to insert the tracking code in either the header, or the footer file and it will track every page of your blog.
When you have inserted the code, your stats will be updated by Google every 24 hours, and that’s it – easy as pie!
However…..Google Analytics also let’s you track e-commerce transactions, this let’s you follow the website visitor all the way through your website order process from start, to finish. Analytics can even record the sale data, this can then produce a wide variety of reports including the conversion rate of your site, the amount of $$$ you are earning per visitor and much more.
This is slightly more tricky to set up, but I would be happy to put together a step by step guide if any of you would be interested? Let me know by posting a comment, if enough of you are interested I’ll make it into another “Mildly interesting postâ€!
Thanks for reading, 🙂
Dan
A Quick Way To Change Your Copyright Dates
A Quick Way To Change Your Copyright Dates
So…it’s 2008, it’s scary to think this blog has been on the go for almost 2 years, doesn’t time fly?!
I fully intend to start as I mean to go on, so I’m going to kick of this year with a really, really useful, time saving tip for all of you that have a website and/or blog. Picture this scenario:
“It’s January 1st, you are feeling terribly hung over from the night before, your head is pounding and all you want to do is go back to sleep. But you can’t, why?
Because you have OLD COPYRIGHT NOTICES ON YOUR WEBSITE!!â€
OK, so maybe you don’t get THAT worked up about changing your copyright notices, but it is still a job that needs doing, and if you have a lot of websites it could take you a full day to change everything to the new date. You could always leave them with the old year on but that does look a bit unprofessional and lazy.
Luckily there is a quick way to change your copyright notices to the correct year, on auto-pilot. As soon as the clock hits 12.01 on January 1st, your copyright notices will update.
How do we do this?
It’s the magical 3 letter word again…..not that one, the other one 😉
PHP
Yes, adding a simple snippet of PHP code to your page will automatically show the correct year to your website visitors. I have already implemented it into this blog, scroll right to the bottom and look at my copyright notice, the notice will always show the correct date, you will need to wait until this time next year to test it out but you can take my word for it!
Now let me show you how to do this.
Open up your web page in your favourite editor (Dreamweaver, Frontpage, NVU etc.) and find the place that contains your current copyright statement (HTML/Code view). Replace the year with the following code:
<?php echo date(‘Y’); ?>
That will automatically display the current year on your page, that’s it, dead simple! Just a quick side note, don’t copy/paste the code direct from this page, WordPress tends to mess up the little quotation marks when you copy/paste!
Here’s an example of the statement on a website I built:
![]()
As the code is PHP then you need to make sure that your page is saved with a .php extension, and that your web server is capable of running PHP pages. – If it isn’t, why not check out D9 Hosting?
You can also get your web server to display your .html or .htm pages as PHP, just open up your .htaccess file and add the following line. If you don’t have a .htaccess file, you can easily create your own, just create a new text document and then rename it to “.htaccessâ€
![]()
You should now be ready to add auto-updating copyright notices to your websites. If you haven’t yet updated your 2007 notices why not give it a try?
As always let me know if you have any questions and feel free to leave any comments.
Here’s too a prosperous 2008!
Regards,
Dan
Receive FREE Email Updates, according to one reader it's....
"Better Than A Poke In
The Eye With A Sharp Stick"
Currently Enjoy This Blog More Than Christmas.

Follow Me Via RSS!

Subscribe to this site's RSS feed.