Back To Basics – What Is Internet Marketing
I’ve been very slack on my blog posts recently, the month of July seems to have passed me by completely…blog post wise anyway. Back in the “real world” I’ve been busy going to relatives birthdays, going on a mountain walk (note I didn’t say walkS….1 was more than enough), and in 6 days I’m going to Headingley in Leeds to watch day 5 of the Ashes test match between England & Australia. So despite going easy on the Internet stuff, I’ve been having a good time which I suppose is the reason we all decided to become Internet Marketing people.
Anyway, back to business.
It’s come to my attention that a lot of the content I’ve been posting on here for the past 3 years has been going over a lot of peoples heads. So I’m going to go back to basics with this post, and just give you an idea of how to get started in Internet Marketing and what to look out for along the way.
If you already know this stuff I apologize, but in the long run this post should help more people keep up with some of the more advanced things I have written about in the past, and that I plan to write about in the future so bare with me.
Getting Started
The first thing you need to grasp is an understanding of what Internet Marketing is all about, if we are to break it down into its simplest form, it’s about making money by selling things on the Internet both directly, and indirectly.
So you need to decide what you are going to sell, here are the options for you:
1. Create your own product/service and sell directly to customers
Examples of my own: D9 Hosting, Boomerang List Builder
2. Sell other peoples products that come with resale, or private label rights
Examples of my own: El Passo Software, El Passo Books
3. Promote other peoples products as an affiliate (Earn commission for any items you sell)
Examples of my own: DLGuard Review, Resell Rights Fortune Review
4. Create a content site and generate income from advertising
Examples of my own: Tattoo Intel
Each of the above have their advantages and disadvantages. So I’m now going to give you a quick run down of the above points and hopefully make everything a bit clearer for you.
Option1: Create Your Own Product
Creating your own product CAN be a big money maker – it might not be, but if you target the right niche and create the right product then the potential is huge.
Take D9 Hosting as an example, I created it back in 2007 with my business partner Paula Brett when we saw a gap in the hosting market, as far as we could tell there was no affordable, reliable web host out there that knew Internet Marketing like we did – I’m not being big headed there either, we have over 10 years experience between us and I genuinely feel you’d be hard pushed to find a more marketer friendly web host.
So to cut a long story short, we created D9 Hosting, which is now hosting thousands of websites for clients all over the world, the income generated through D9 provides a full time wage for both myself and Paula – all because we saw a gap in a market and created a service to fill that void.
I’m using the hosting market as an example but you can use anything you have an interest in, lets say for example that you enjoy mountain walks. I don’t have any numbers but I’d imagine there’s a lot of people interested in mountain walking that are looking for the best routes and secret tracks up xyz mountain, so why not compile an eBook showing the best routes to take up xyz mountain and sell it to amateur mountaineers like myself!
That may not be the best example, I have no idea what the mountaineers niche is like, but I would have certainly loved a guide I could have used last week, it might have stopped us going up the wrong path and adding an extra 3 miles to our journey 🙁

But hopefully you can see what I’m getting at, if you can find a gap in a market then creating your own product to plug that gap can be very lucrative.
What sort of product could you create?
1. An eBook
2. Some software
3. Training course
4. Video guides
5. A service
6. A membership site
7. And anything else you can think of!
Advantages of creating your own product:
1. Keep 100% of the sales generated
2. If you tap into the right market income potential is huge
3. Have total control over the product you are selling
Disadvantages of creating your own product:
1. Depending on the type of product you create, the costs could be high
2. You may target the wrong niche/market and your product may not sell
3. Can be disheartening to see that people don’t actually like your product (It happens!)
Resources:
Operation eBook – How To Create Your 1st eBook
Option 2: Sell Products With Resale/PLR Rights
This is how many of us; myself included, got into Internet Marketing. Back when I first started Marketing the first thing I sold was a collection of eBooks with resale rights that I purchased from John Thornhill. I sold these on eBay and made around £90 (about $160) each week, which for a teenager was pretty good going!
Back then, the “Resell Rights” market was still very much in it’s infancy, the only products with resale rights you could get your hands on were eBooks, nowadays there are tons of top quality items out there that come with either resale, or private label rights including videos, training courses, software products and so on.
If you buy the resale rights for these items, it means you are able to sell on the items as many times as you like, keeping all of the profits for yourself. With Private Label Rights (PLR) products you can even alter the items and pass yourself off as the author of the product!
I actually still have my very first marketing website online, El Passo Books, and it still makes a few sales every week to this day. All the products you see on the site come with resale rights, in total I paid around £30 for the website and all of the eBooks you can see on it, so when you consider the main package sells for £12.99 each time you can see it has been a wise investment!
Advantages of selling items with resale rights:
1. Usually dead cheap to purchase
2. Can sell them multiple times and keep the profit
3. Pass PLR products off as your own (Also saves time)
Disadvantages of selling items with resale rights:
1. Lots of other people could be selling the same product as you
2. Sometimes items can be sold very cheaply and are devalued
Resources:
John Thornhill’s Ready To Go eBook Business
Option 3: Promote Products As An Affiliate
This is personally my favorite method, as once I’ve set an affiliate promotion up I can pretty much sit back and forget about it. All I need to do is drive customers to the products sales page and watch the commission come in.
I’m sure you all know what an affiliate link looks like, it’s usually something along the lines of:
www.mysupercoolsite.com?aff=funkychicken
If someone were to click on that affiliate link, and then purchase something off mysupercoolsite.com I would earn a commission.
I wouldn’t have to deliver the product to the customer, and I wouldn’t have to provide them with the support!
Some of my most profitable ventures are affiliate websites, and I do plan to write an eBook (option 1!) on the subject so keep your eyes open for that.
If you are starting out and don’t have much startup capital available to you then I’d strongly recommend going for this method. It can be set up for free and even if you don’t make a sale you won’t have lost out financially, and you’ll have gained some valuable experience from the project.
Adavntages of promoting products as an affiliate:
1. No customer service to provide
2. No startup costs (in some cases)
3. If you target the right product it’s easy money
Disadvantages of promoting products as an affiliate
1…..I can’t really think of any to be honest!
Resources:
How I Dominated Google For Resell Rights Fortune
How I Dominated Google For John Thornhill Coaching
Option 4: Create Content Site & Profit Through Advertising
I’ve actually tried this a few times, but to be honest unless you have a really high traffic website you’d be better off sticking to another method.
The idea is to get people to your website by providing them with quality information that they are looking for, you’d then place relevant adverts on that website in the hope that people would click on the adverts and make a purchase. An example site of mine that uses this strategy is Tattoo Intel, it’s a site that provides all sorts of information on tattoos, you’ll also be able to see banner adverts on the page.
I make a few sales from these but nothing like I do from the other sites, if I were able to generate more traffic to the site then I dare say it would be more worthwhile, however at present it isn’t really a viable option for me when the other methods are bringing in more money with less work needed on my part.
Advantages of content sites with advertising
1. No customer service to provide
2. Cheap to setup, only a domain name and hosting needed
Disadvantages of content sites with advertising
1. Need to generate a lot of traffic to see decent results
2. Sites need updating quite often to keep people coming back for more
So there you have it, a brief overview of the main methods Internet Marketers use to make money online. It’s a very broad overview but it should give you a basic understanding of everything and help you understand what I’m talking about in some of my more advanced blog posts!
If you are just starting out, what I’d personally advise you to do is read through this post a couple of times, then decide which plan of action is for you. When you’ve done that, write down what you are going to try and do and do it. Don’t worry if you fail, you won’t know unless you try!
As always thanks for reading and let me know if you have any questions.
Regards,
Dan
Can You Be A Marketer & A University Student?
Filed under: My Offers
Before I get into it, let me just point out that I’ve taken this article directly from an email I sent out, but I know a lot of you are on the RSS feed rather than the mailing list so I’m posting it here as well…just ignore any references I might make to “the email” 🙂
I’m going to tell you a really cool story about someone who started marketing at around the same time as me, he’s actually a few years younger than me as well so he must still have been at school when he started. (I was in college)
He’s from the UK (like me), he’s called James Penn and he is currently a full time University Student studying* Psychology, which isn’t anything out of the ordinary for a 19 year old guy, but here’s the cool bit.
He hasn’t put his marketing business on hold, he is actually running a full time business whilst studying* at University.
So how does he manage to do this?
Well, he tends to work in different niches to me. I’m into the marketing and hosting niches, while he’s into anti-aging and stretch marks…must resist the urge to make a joke!
In these “underground” niches he specializes in creating products and building targeted opt-in mailing lists.
By building these mailing lists in all the different niches, he is able to promote related products to the niches whenever he needs more drinking money….sorry – study books.
As an example, he needed to do some revision for an exam that was taking place the following day, but before opening up his revision books, he spent 15 minutes writing an email promoting a membership site in the niche. Four hours later after he had finished the revision, he returned to his inbox and discovered almost $1,000 in sales – that’s one way to pay off your student loan!!
And that’s just in one niche; he is using his targeted niche mailing lists to put himself through University!
The methods he uses to build these lists are what makes him stand out from the crowd, he doesn’t just rely on the tried and tested formulas for list building, he actually looks at different methods, THINKS ABOUT THEM (there’s a plan!) and then makes them better – it’s a simple idea but be honest, how many of us actually do this?
Like any good marketer, he knows when he’s onto something that works, and like any good marketer, he knows you can make a very tidy amount by selling the details…come on, we all know how it works by now 🙂
Thankfully though, beer is still quite cheap at his University, so he hasn’t given it a home study course price, he’s going to show you exactly how he builds these highly targeted mailing lists for just $10.
And by my accounts, you should be able to buy 2 pints of beer for $10 from his University bar, and he aims to sell 1,000 of his guides….I’ll let you work out the rest of it 😉
So if you are looking for different ways to build your mailing list, or if you already have a good sized list and just want to get some fresh ideas, then do check out his report, it’s a steal at just $10!
http://elpassoblog.com/recs/james_penn.php
And before signing off, I would like to mention I’m not being serious with all the drinking stuff, I’m being very stereotypical and tongue in cheek – James is a top guy, and certainly isn’t a “layabout” student 😉
Thanks for reading, and as always let me know if you have any questions.
Dan
*Drinking and hitting on girls
Why Sell Something, When You Can Give It Away FREE?
A warm welcome from the Yorkshire dales, I believe the technical word for this weather we are experiencing today is “Summer”, it’s making me feel the need to go outdoors but I’ll resist the temptation whilst I write this blog post.
In todays post I’m going to look back at the events of the past few weeks, as it’s given me some food for thought, and I’m in two minds about what to do, so I’d appreciate it if you could have a read through what I’m about to write and give me your opinions.
It all started a few weeks ago when Socrates Socratous asked me if I’d consider giving away a copy of my Boomerang List Builder software to all people that signed up to his Resale Rights Fortune pre-launch list, so without much hesitation I agreed.
Why Did I Agree To It?
Quite simply because I knew the launch would be huge, and if I had a “soft opt-in” in place, I would get a ton of new subscribers – and I did!
Take a look at the new size of my mailing list:
And I would like to point out that this is probably one of the only times I’ll ever show you a screen shot of my mailing list numbers, so make the most of it!
And I’m not posting the numbers in a “my penis is bigger than yours” “my Dad is better than your Dad” sort of way, I’m just showing you what I gained from giving it away for free – a ton of new mailing list subscribers.
So fast forward a couple of weeks to the end of the launch, and I’m still getting a few new subscribers each day from Resale Rights Fortune.
So here’s the dilemma, what would happen if I got rid of the $47 Boomerang List Builder price tag, and gave it away for free ALL THE TIME?
If I gave it away for free, I’d be losing upwards of $10,000 each year in sales, but I’d be building my mailing list like there’s no tomorrow, and I could implement a OTO type system so there would still be the potential there to make money from OTO sales, and it would still let affiliates earn commissions for promoting.
I know as a customer you will be leaning towards the “Free” option – and I don’t blame you! But put yourself in my shoes, what would you go for?
Would you keep everything as it is and charge $47 to anyone who wishes to purchase a copy of the software, and have a steady trickle of sales every month?
Or would you give away the software for free in return for an email address, so you’d lose out on the income from sales, but you’d be building a huge mailing list that would potentially be a much bigger earner in the years to come?
And I’ve just had a brainwave…WE SHALL HAVE A POLL!
Possibly the first ever poll on the El Passo Blog, what a joyous occasion – so go ahead and vote in the poll, then tell me what you think in the comments section below!
Welll….we were going to have a poll until the plugin decided to stop working, so we’ll have to make do with just leaving your thoughts in the comments section instead, sorry about that, I was really excited about the 1st El Passo Blog poll as well 🙁
Thanks for reading and I look forward to hearing your suggestions.
Regards,
Dan
How I Dominated Google For Resell Rights Fortune
How I Dominated Google For Resell Rights Fortune
Hello, welcome, greetings, good to see you etc, etc, etc.
Today I come bearing gifts, it’s not gold, frankincense and mur, but it’s something that could be just as valuable in the long run. I’m going to show you how I “took over” Google during the launch of Resell Rights Fortune.
Just a bit of background info before we get started.
Resell Rights Fortune is a product from Socrates Socratous, that was released on the 9th June. The product allows you to save time, by searching through a database full of different resale rights and private label products – eBooks, scripts, software, videos and so on.
Socrates asked me to promote the product for him a couple of weeks before the launch, so I put my thinking cap on and decided upon a plan of action.

As there was still 2 weeks until the launch, I decided to use a method I’d used in the past. I’d create a simple WordPress Blog, purchase a related domain name, and add some good content to the blog that relates to the product, and if all goes according to plan, I’ll end up with a good placement on Google.
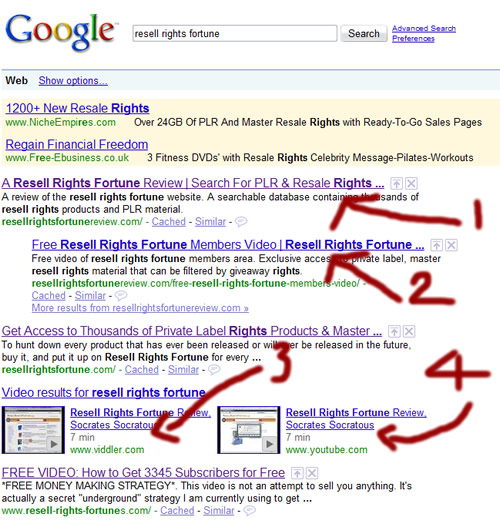
I’m pleased to report that my plan worked, take a look at the image below!
As you can see, I take the first, second, fourth and fifth position on Google for the term “Resell Rights Fortune“, I even pushed down the actual Resell Rights Fortune site into 3rd place. (Sorry Socrates:-))
You are probably thinking that’s all well and good, but does it actually get any traffic?
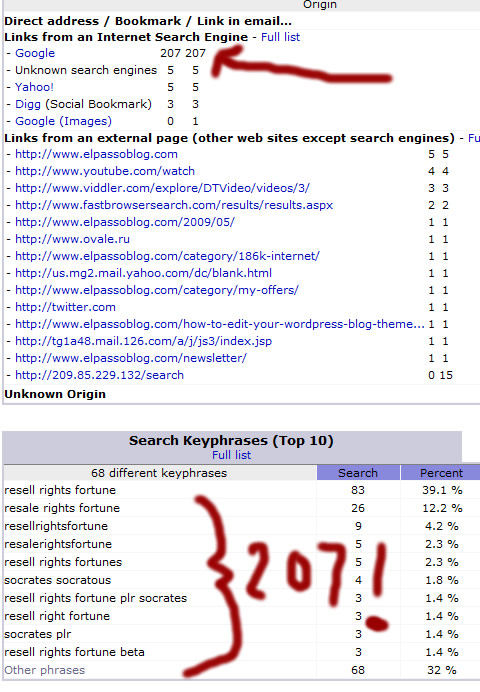
Simple answer, yes, it does. More proof for you below:
As you can see, the site received 207 hits from Google during the launch period, all of these people looking for more information on the Resell Rights Fortune product.
The site that took me less than 2 hours to setup, has helped to bring in over $2,000 in sales of the product so far, so it does work! Yes, I did send out a mailing to my list that also contributed to the sales total, but the number of clicks generated from the email was 182, so even if we say it was a 50/50 split between the list and the site, it’s still $1,000 which can’t be sniffed at for 1 simple site.
So hopefully I’ve given you enough evidence there to show you that what I did does actually bring back results, so here is EXACTLY how I did it:
1. I purchased the domain name www.resellrightsfortunereview.com from D9 Hosting. ($9.99 per year)
2. I found a WordPress theme that I liked, and then set up a blog on the domain which again, I hosted with D9 Hosting. ($6.95 per month)
3. I created a quick “sneak preview” video showing you what it was like inside the members area. I then distributed the video to a network of video sites using Heyspread.
4. I wrote some posts that I could put on the blog, each showing the reader different aspects of the Resell Rights Fortune (RRF) Product.
5. I put a link to the RRF blog on this blog, so Google could find it.
6. Once Google had indexed the site, I posted a new article every few days to keep the content fresh.
That’s it!
There really is nothing to it, so why not give it a try next time there’s a big product launch coming up? It’s a lot easier to get a few hundred hits from Google than to build a few hundred new mailing list subscribers 🙂
I’ve also just realized that I did make a blog post similar to this way back in October…..although in that promotion I used a slightly different method, so if you want another twist on the method check out the following post:
https://elpassoblog.com/how-one-video-dominated-google-for-john-thornhill-coaching/
And that just about wraps it up for this weeks blog post, I know a lot of you are first time readers, so I hope you found the information useful, and do let me know if you have any questions or feedback by leaving a comment in the section below.
Cheers!
Dan
How To Make A Full PC Backup And Restore After Hard Drive Failure
Wow, that’s a bit of a long title isn’t it. I wonder if the search engines will like it? At least it’s nice and descriptive!
This post is going to be another of my free “How To” guides, but this time I’m not going to be showing you anything Website, or Internet Marketing related. I’m going to show you how to do something everyone with a computer should do at some point – get a full backup of your computer!
I don’t just mean important files and your favourite holiday snaps, I mean a backup of EVERYTHING. Program files, Windows, System Files/Folders, hard drive partitions and so on. If you have a backup of absolutely everything on your computer, you are covered in the event of a hard drive failure and can be back up and running as if nothing has happened in a matter of minutes.
I haven’t just thought of this subject off the top of my head, I had a hard drive failure last week so whilst I did the backup/restore procedure I took some pictures so I could show you all how to make a full computer backup, and then restore it on a new drive if things go bad. Here’s the story.
I was happily working away one day, when suddenly the computer stopped responding. I had no choice but to do a hard power down. (Turn it off and on again!)
During the boot process, I was shown an error message saying that one of the hard drives installed on the computer was failing, and I should get a backup of everything ASAP.
So as soon as I saw that message, I booted up and generated a full backup using Acronis True Image Home – and I’m not just doing a sly bit of product placement here, I do actually use the software I’m recommending :-0
**Just a side point for any techie’s reading before you try and trip me up – the system has 2 drives in a RAID 0 setup, and 1 of the drives was in the process of failing, it hadn’t totally given up the ghost, hence I was able to boot up**
Don’t worry if the above paragraph goes over your head, it’s not important!
Of course if you run a backup, you need somewhere to store that backup. There’s no point running a backup and then saving it on the drive that is failing. So you really need another drive to store your backups on, I personally use an external USB hard drive. They are dirt cheap at the moment so there’s no excuse not to have one.
I flew through that section a bit, so here’s how to create a full system backup in some easy to manage steps:
*Before I start, I should point out that I’m running Windows Vista Home Edition. So if you are running XP home, professional, or have a MAC then the screens may look slightly different from how the appear on here*
1. Plug in your external USB hard drive (ignore this step if you are using an internal drive)
2. Open up Acronis True Image Home (15 day free trial available)
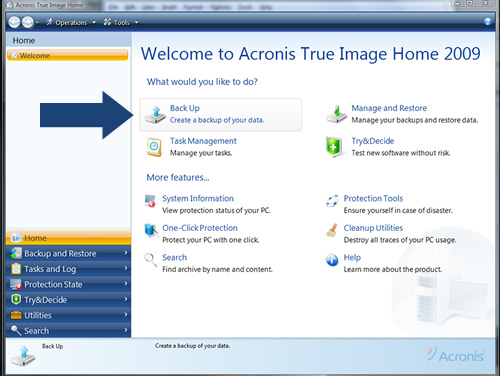
3. Click on the “Backup” Icon
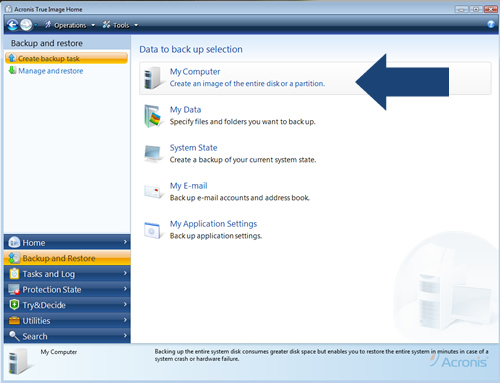
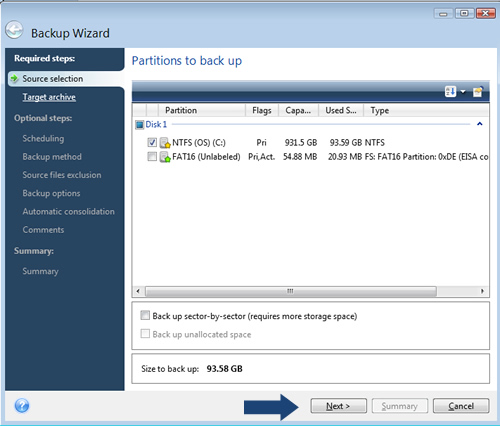
4. Click on the “My Computer” icon to create a backup of the entire disk or partition
5. Select the disk you would like to make a backup of and click “Next”
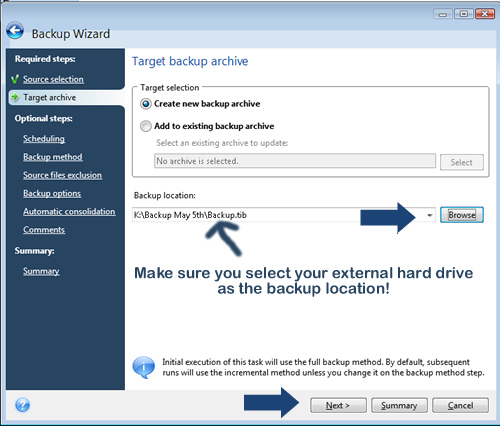
6. As this is your 1st backup, select the “Create new backup archive” option, and then click on the “Browse” button to locate your external drive. When you have selected a location to save the backup to (your external hard drive), click on “Next”
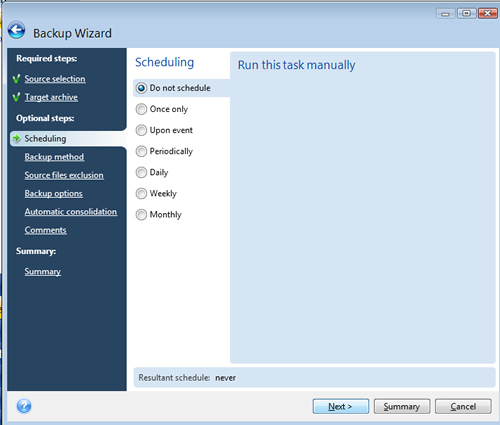
7. You will then be asked if you’d like to schedule the backup, at this time we want to create the back up right away, so select “Do not schedule”, but it’s worth remembering you can use the program to make an automated backup for you on a daily, or weekly basis.
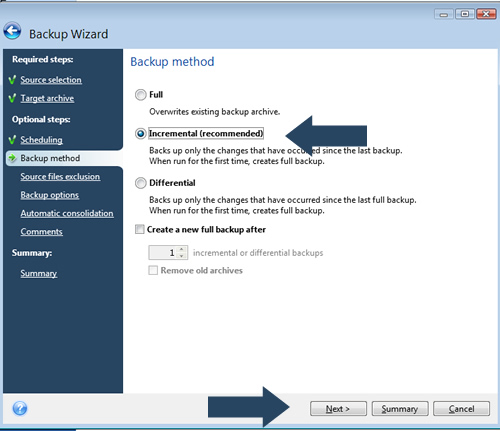
8. Next you are asked to select the backup method, as this is your first backup, you can select “Incremental”. This will create a full backup if it’s your 1st time (don’t be nervous), or if you are adding to an existing backup it will only backup the files that have changed since your last backup.
9. You can then choose to exclude certain files from the backup, this includes hidden files, system files, or any other filenames that you specify using custom criteria. As we want to backup absolutely everything, leave the boxes unchecked and click on “Next”
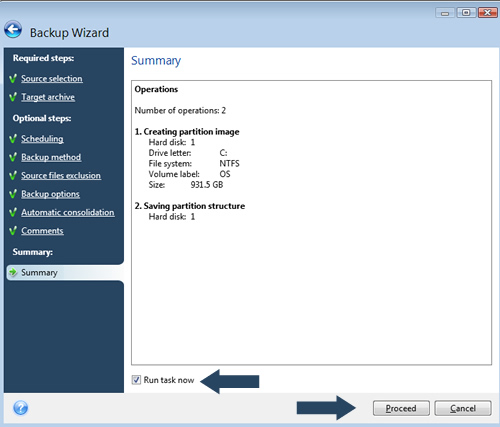
10. The next few steps can all be left as they are. So keep clicking “Next” until you get to the summary screen.
11. Make sure the “Run task now” box is checked, and then click on “Proceed”
12. You will then see a status bar showing you the progress of your backup. When the backup generation is complete, a confirmation will appear on screen and you can unplug your external hard drive, safe in the knowledge you have a full backup incase of a system, or hardware failure.
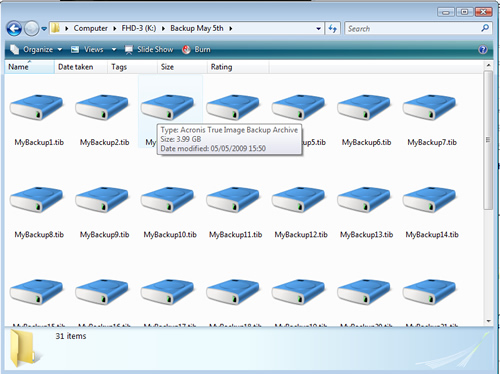
If you want to confirm everything has been backed up correctly, just open up your external drive and locate where you saved the backup. You should then be able to see your backup archives in all their glory!
So that’s the backup out of the way, even if you don’t think a system failure or hard drive combustion (can a hard drive combust?) will ever happen to you, I’d urge you all to make a full backup of your system! It only takes a few minutes to start the backup process, and it will save you LOTS of hassle if your computer goes belly up like mine did. With a full system backup you can restore everything to exactly how it was before a crash, you don’t need to reinstall any programs or operating systems!
Anyway, back to my story. If you have a short attention span, here’s where we are at:
One of my hard drives failed, so I made a full system backup onto an external hard drive.
The next step was to replace the faulty drive.
As I had a RAID 0 setup, which in very basic terms is a bit like having 2 disks running as 1, doubling your disk space. The new disk would need to be a replica of the other disk – or so I was told!
So I decided that instead if replacing just the faulty hard drive, I would replace both of them with brand new drives, in the process I’d increase the disk space on the computer from 300GB to 1TB, hard drives are dirt cheap now so it seemed silly not to. A good UK supplier of all things hardware related is CCL Online, I get all of my computer “bits” from there. So if you are after a new external or internal drive I can highly recommend them.
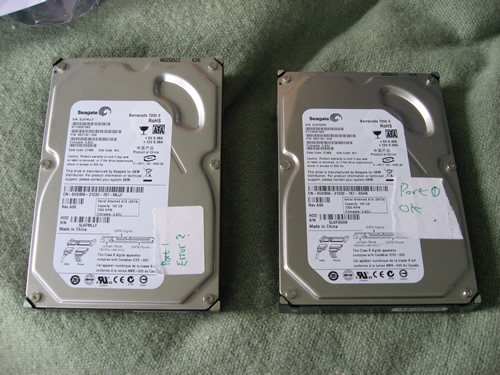
My new drives arrived the next day, so my next task was to remove the 2 old drives and replace them with the new ones. When I was taking them out, I made sure to make a note of which was the faulty drive so I could keep the remaining good drive for future use.
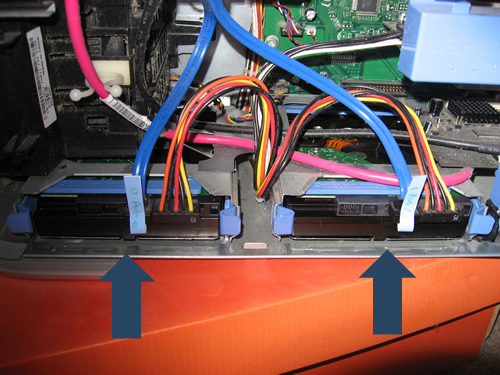
The actual installing of the new drives is pretty simple, although I suppose it all depends on your PC case. From the image below, you can see that my 2 drives are at the bottom of the case, and slide in and out. Yours may be positioned in a different place but the general idea is the same. You need to slide out the dock, and unscrew the old hard drive, replacing it with the new one. You’ll then have 2 connections going into the drive, the blue connector you can see on the image is the SATA cable that will go into your motherboard, and the wider, multi-coloured cable is the power cable, and this goes into the power supply.
**Top tip**
If one of your leads going into the hard drive is a wider, white/cream coloured cable then you will have an IDE hard drive, and not SATA, so bear that in mind if you are looking to replace a drive!
When you have ensured that your new drives are in place, you can turn on your computer. This next step depends on your computer setup, but you may be able to see a screen showing you the drives that are installed on your computer. As you can see from the image below, both of my new drives appear:

There are then 2 ways to do the next step. If you think about it, you’ve now got a brand new drive installed, but the drive is clean, it has no data on it at all – not even an operating system.
So here are your 2 options:
1. Reinstall windows using your boot CD
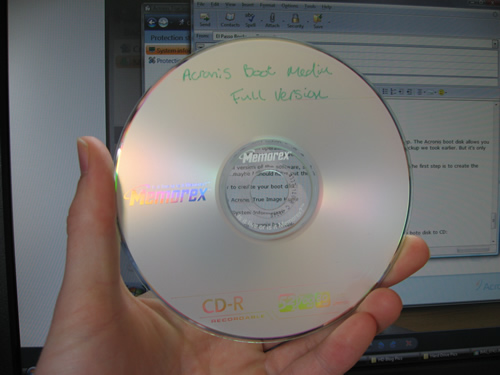
2. Use the Acronis boot disk to restore everything
Option 2 is the quickest option, as it allows you to skip the reinstall windows step. The Acronis boot disk allows you to boot up, without an operating system, and restore your computer from the backup we took earlier. But it’s only available if you purchase the full version of the software, not the 15 day trial.
I own the full version of the software, so I’ll show you how to use the boot disk. The first step is to create the rescue disk..maybe I should have put this further up in the article 🙂
Here’s how to create your Acronis boot disk:
1. Open up Acronis True Image Home
2. Click on “System Information”
3. Click on “Create Acronis bootable media”
Go through the Wizard clicking “Next” when prompted, and you can then burn the boot disk to CD (or DVD):
You should now have either your Acronis rescue boot disk, or your Windows boot disk ready to go.
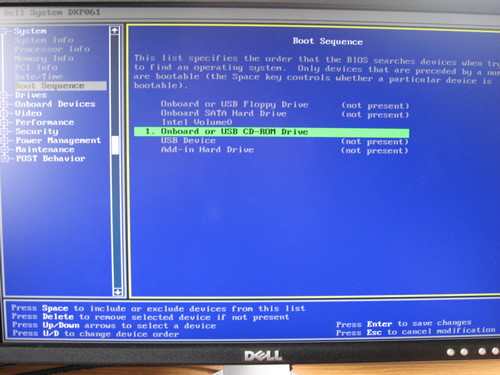
So the next thing you need to do is go into the BIOS and change the primary boot device to your CD/DVD drive, this will allow us to boot using the CD.
The way to do this will vary depending on the BIOS your are using, I’m using a Dell Dimension 9200 Desktop PC with the DXP061 BIOS…at least that’s what it said on the screen 🙂
To get into the BIOS on a Dell PC, power up the PC and keep tapping the F2 key until the blue screen appears.
When the blue screen appears, use the arrow keys on your keyboard to go down to the “Boot Sequence” option, push “Enter” on your keyboard, then move down to “Onboard or USB CD-ROM Drive” and push the space bar on your keyboard to set it as the primary boot device. You can then insert your CD (Windows or the Acronis boot CD), save the changes and then exit.
**Top Tip**
Before changing the order of the boot sequence, make a note of the old boot sequence then you can easily change it back when we are done!
When the computer reboots, it will boot using the CD you just entered in the drive. If you are reinstalling Windows go through the installation process to do a clean install, once installed, you can download the free 15 day trial of Acronis True image home. If you open it up we can then restore the backup we took earlier, as shown below.
Using the Acronis boot disk means we can skip the above step, and get straight down to restoring our backup.
To restore the backup using Acronis True Image Home 2009:
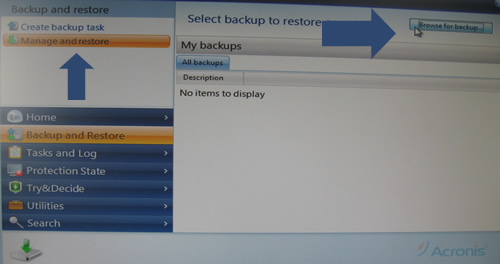
1. Click on “Backup and Restore”
2. Click on “Manage and Restore”
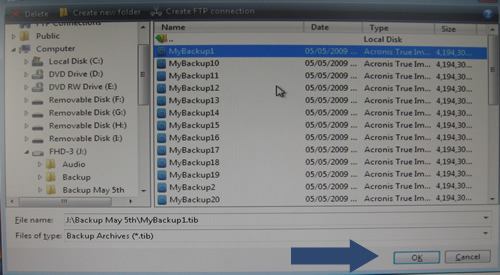
3. Click on the “Browse” button to locate the backup we saved on our external drive
4. When you’ve found the backup, click on one of the archives and click on “OK”
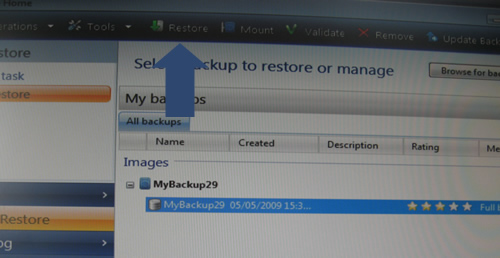
5. You’ll then see a summary of the backup, click on the backup and then click on the “Restore” icon towards the top of the page. Apologies for the quality of these pictures by the way, they were taken using my digital camera as I was doing the backup of my own PC!
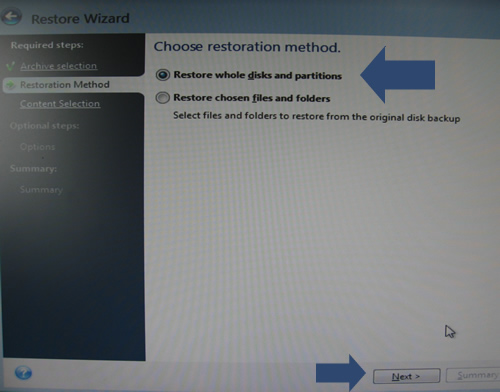
6. You can then choose the restoration method, you can either restore individual files and folders, or you can do a full restore. This restores your computer back to the exact state it was in when you took the backup, this includes absolutely everything!
Select “Restore whole disks and partitions” and click on Next.
8. The next step asks us where we’d like to restore the data to, we need to select the new drive (or drives) that we have just installed. Select the new drive and click on Next.
If you have chosen to go down the Windows reinstall route, you may see a warning saying that the drive contains useful data, and restoring the backup will delete that data. If the message appears, click on “OK”.
You will then be shown a summary of the actions that will be taken, click on “Proceed”.
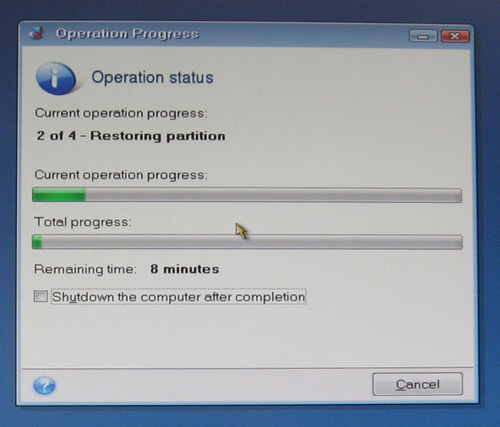
Your computer will then reboot and the restore process will begin, you’ll be able to see a dialog box showing you the progress of the restoration.
When this is complete, your computer should boot back up as normal and will be in the same state it was when you took the backup, but this time you’ll be running on a new hard drive and not the old faulty one 🙂
**Top Tip**
Remember to go back into your BIOS and set the boot sequence back to normal, this will ensure you don’t keep booting from the CD each time you turn on your computer!
So, in a nutshell, that’s how you make a full system backup of your computer, and how you restore it. It’s a very simple task as long as you are using Acronis True Image Home, there is a 15 day free trial but I purchased the full version, it’s worth it just to be able to create the rescue boot disk…
But I’m not done yet.
This next step might not apply to you, but I’ve got some screenshots so I may as well use them 🙂
My computer was now restored to it’s old state, Windows Vista home was running as normal, and all of my installed programs were intact, but I did have one small problem.
As the new hard drives I had installed had a larger capacity than the old drives I removed, I needed to resize the partition so I could use the new space I had gained from changing the drives. When I restored using True Image home, it restores a full image of the old hard drive, including the drive size.
So I needed to resize the partition.
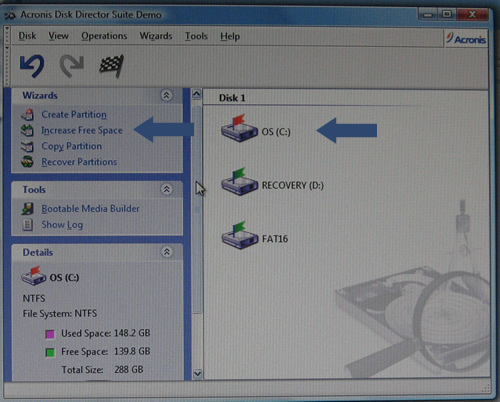
Normally doing this would mean a loss of data, but luckily I found some more Acronis software to use. I used the Acronis Disk Director suite, to quickly and easily increase the size of the partition, without losing any of the data I had just restored.
To increase the size of a hard drive partition, without losing any data:
1. Open up Acronis Disk Director Suite
2. Click on the partition size you want to increase
3. Click on the “Increase free space” icon
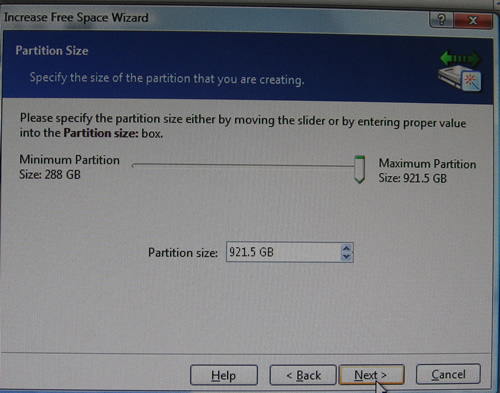
You will then be presented with an easy to use Wizard, go through the wizard until you get to the screen below, this then allows you to resize the partition. You can either take the space from another partition, or you can use the un-used space on the drive. (This is what I did)
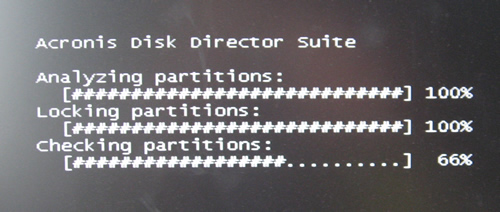
When you have gone through the Wizard, you’ll see a confirmation on screen of the tasks that will be undertaken. When you are happy with this, click on the “Commit” button, your computer will then reboot and the changes will be made.
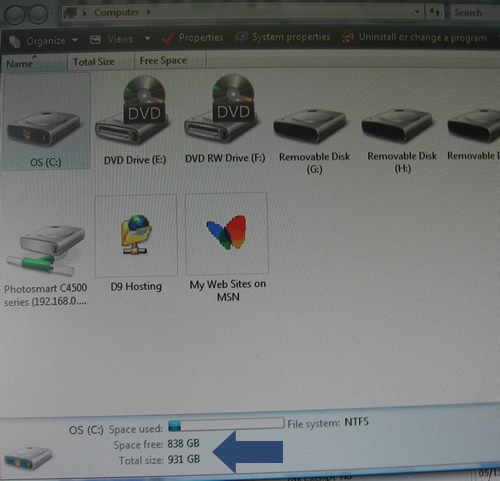
When you reboot, and go into “My Computer” you should be able to see that the size of the disk has been changed, and the software has done it’s job correctly 🙂
And there you have it, what started out as a simple blog post has morphed in what seems to have been one of my longest posts ever. I should really have turned it into an eBook…maybe I still could, but I think it should prove to be a very useful free resource. If something like this existed when my hard drive died it would have saved me a lot of research time, so hopefully it will help someone out there do the same.
So thanks for reading, and let me know if you have any comments or questions.
*Update*
You’ve probably already guessed that the links to the software I used ARE affiliate links…I need to get something out of the hours of typing don’t I? 😉
But when I signed up to the affiliate program, they did send me a list of coupon codes that can be used against all Acronis products. I don’t know if they will keep sending me new coupons each month, as the coupons I have at present are for May 2009 only, so I’ve listed them all in a section on the blog, and I’ll update it with more Acronis coupon codes if and when I get them.
Thanks for reading,
Dan


