How I Dominated Google For Resell Rights Fortune
How I Dominated Google For Resell Rights Fortune
Hello, welcome, greetings, good to see you etc, etc, etc.
Today I come bearing gifts, it’s not gold, frankincense and mur, but it’s something that could be just as valuable in the long run. I’m going to show you how I “took over” Google during the launch of Resell Rights Fortune.
Just a bit of background info before we get started.
Resell Rights Fortune is a product from Socrates Socratous, that was released on the 9th June. The product allows you to save time, by searching through a database full of different resale rights and private label products – eBooks, scripts, software, videos and so on.
Socrates asked me to promote the product for him a couple of weeks before the launch, so I put my thinking cap on and decided upon a plan of action.

As there was still 2 weeks until the launch, I decided to use a method I’d used in the past. I’d create a simple WordPress Blog, purchase a related domain name, and add some good content to the blog that relates to the product, and if all goes according to plan, I’ll end up with a good placement on Google.
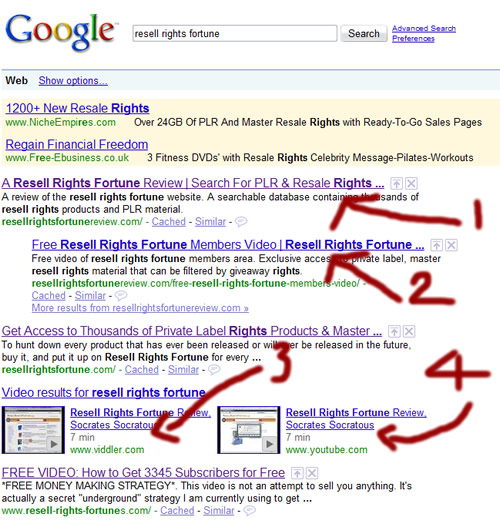
I’m pleased to report that my plan worked, take a look at the image below!
As you can see, I take the first, second, fourth and fifth position on Google for the term “Resell Rights Fortune“, I even pushed down the actual Resell Rights Fortune site into 3rd place. (Sorry Socrates:-))
You are probably thinking that’s all well and good, but does it actually get any traffic?
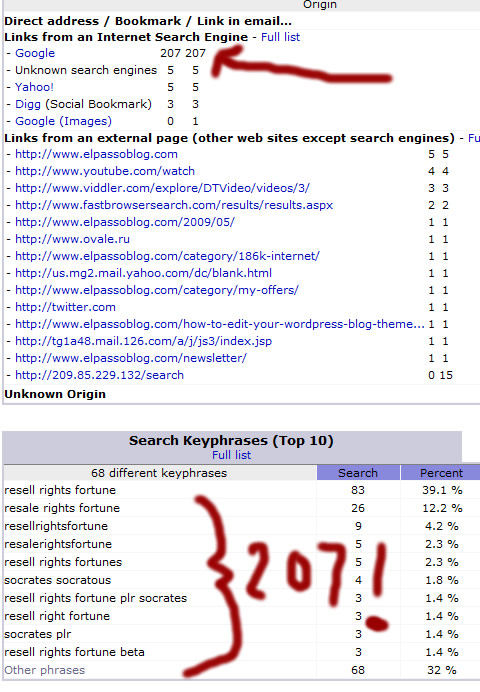
Simple answer, yes, it does. More proof for you below:
As you can see, the site received 207 hits from Google during the launch period, all of these people looking for more information on the Resell Rights Fortune product.
The site that took me less than 2 hours to setup, has helped to bring in over $2,000 in sales of the product so far, so it does work! Yes, I did send out a mailing to my list that also contributed to the sales total, but the number of clicks generated from the email was 182, so even if we say it was a 50/50 split between the list and the site, it’s still $1,000 which can’t be sniffed at for 1 simple site.
So hopefully I’ve given you enough evidence there to show you that what I did does actually bring back results, so here is EXACTLY how I did it:
1. I purchased the domain name www.resellrightsfortunereview.com from D9 Hosting. ($9.99 per year)
2. I found a WordPress theme that I liked, and then set up a blog on the domain which again, I hosted with D9 Hosting. ($6.95 per month)
3. I created a quick “sneak preview” video showing you what it was like inside the members area. I then distributed the video to a network of video sites using Heyspread.
4. I wrote some posts that I could put on the blog, each showing the reader different aspects of the Resell Rights Fortune (RRF) Product.
5. I put a link to the RRF blog on this blog, so Google could find it.
6. Once Google had indexed the site, I posted a new article every few days to keep the content fresh.
That’s it!
There really is nothing to it, so why not give it a try next time there’s a big product launch coming up? It’s a lot easier to get a few hundred hits from Google than to build a few hundred new mailing list subscribers 🙂
I’ve also just realized that I did make a blog post similar to this way back in October…..although in that promotion I used a slightly different method, so if you want another twist on the method check out the following post:
https://elpassoblog.com/how-one-video-dominated-google-for-john-thornhill-coaching/
And that just about wraps it up for this weeks blog post, I know a lot of you are first time readers, so I hope you found the information useful, and do let me know if you have any questions or feedback by leaving a comment in the section below.
Cheers!
Dan
How To Make A Full PC Backup And Restore After Hard Drive Failure
Wow, that’s a bit of a long title isn’t it. I wonder if the search engines will like it? At least it’s nice and descriptive!
This post is going to be another of my free “How To” guides, but this time I’m not going to be showing you anything Website, or Internet Marketing related. I’m going to show you how to do something everyone with a computer should do at some point – get a full backup of your computer!
I don’t just mean important files and your favourite holiday snaps, I mean a backup of EVERYTHING. Program files, Windows, System Files/Folders, hard drive partitions and so on. If you have a backup of absolutely everything on your computer, you are covered in the event of a hard drive failure and can be back up and running as if nothing has happened in a matter of minutes.
I haven’t just thought of this subject off the top of my head, I had a hard drive failure last week so whilst I did the backup/restore procedure I took some pictures so I could show you all how to make a full computer backup, and then restore it on a new drive if things go bad. Here’s the story.
I was happily working away one day, when suddenly the computer stopped responding. I had no choice but to do a hard power down. (Turn it off and on again!)
During the boot process, I was shown an error message saying that one of the hard drives installed on the computer was failing, and I should get a backup of everything ASAP.
So as soon as I saw that message, I booted up and generated a full backup using Acronis True Image Home – and I’m not just doing a sly bit of product placement here, I do actually use the software I’m recommending :-0
**Just a side point for any techie’s reading before you try and trip me up – the system has 2 drives in a RAID 0 setup, and 1 of the drives was in the process of failing, it hadn’t totally given up the ghost, hence I was able to boot up**
Don’t worry if the above paragraph goes over your head, it’s not important!
Of course if you run a backup, you need somewhere to store that backup. There’s no point running a backup and then saving it on the drive that is failing. So you really need another drive to store your backups on, I personally use an external USB hard drive. They are dirt cheap at the moment so there’s no excuse not to have one.
I flew through that section a bit, so here’s how to create a full system backup in some easy to manage steps:
*Before I start, I should point out that I’m running Windows Vista Home Edition. So if you are running XP home, professional, or have a MAC then the screens may look slightly different from how the appear on here*
1. Plug in your external USB hard drive (ignore this step if you are using an internal drive)
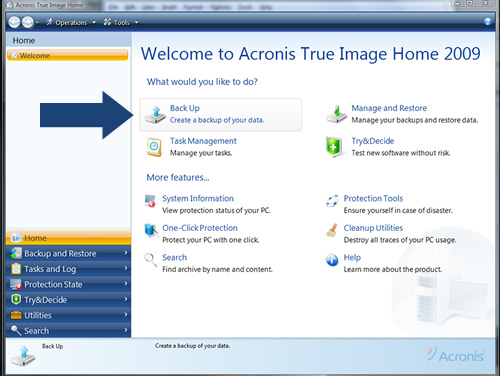
2. Open up Acronis True Image Home (15 day free trial available)
3. Click on the “Backup” Icon
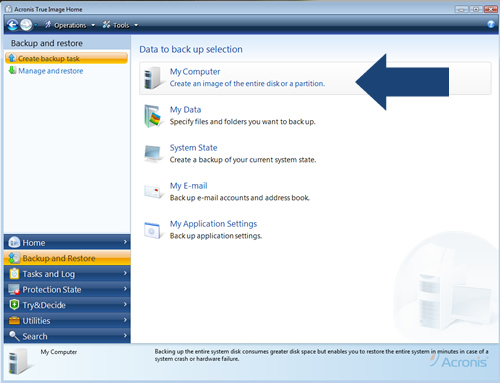
4. Click on the “My Computer” icon to create a backup of the entire disk or partition
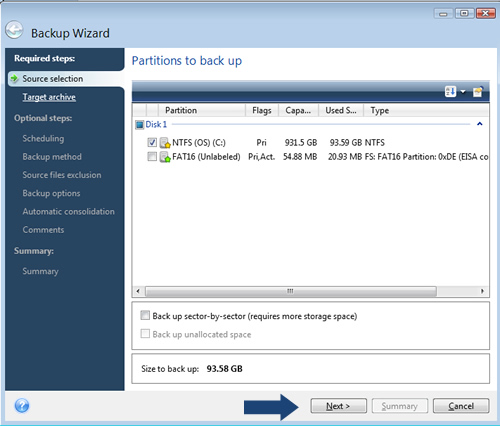
5. Select the disk you would like to make a backup of and click “Next”
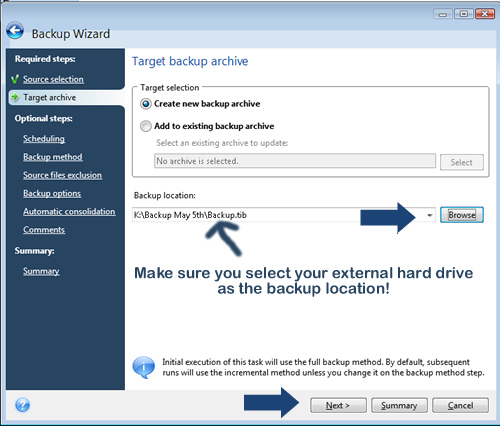
6. As this is your 1st backup, select the “Create new backup archive” option, and then click on the “Browse” button to locate your external drive. When you have selected a location to save the backup to (your external hard drive), click on “Next”
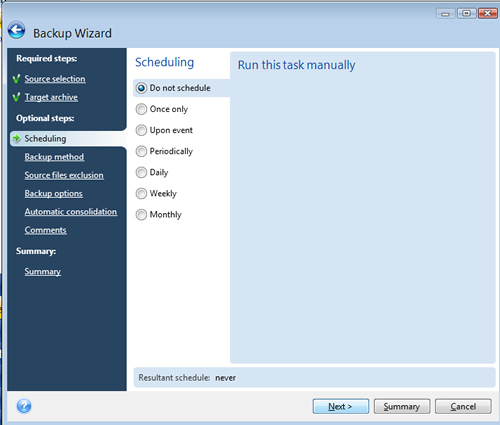
7. You will then be asked if you’d like to schedule the backup, at this time we want to create the back up right away, so select “Do not schedule”, but it’s worth remembering you can use the program to make an automated backup for you on a daily, or weekly basis.
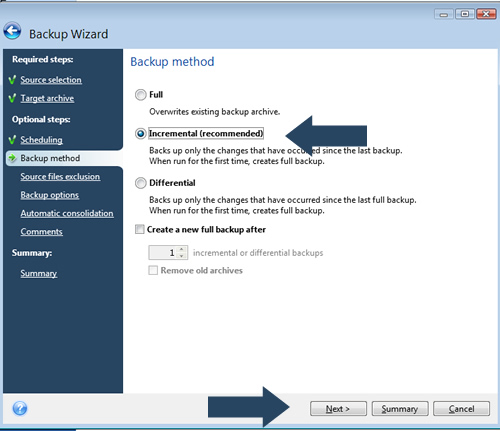
8. Next you are asked to select the backup method, as this is your first backup, you can select “Incremental”. This will create a full backup if it’s your 1st time (don’t be nervous), or if you are adding to an existing backup it will only backup the files that have changed since your last backup.
9. You can then choose to exclude certain files from the backup, this includes hidden files, system files, or any other filenames that you specify using custom criteria. As we want to backup absolutely everything, leave the boxes unchecked and click on “Next”
10. The next few steps can all be left as they are. So keep clicking “Next” until you get to the summary screen.
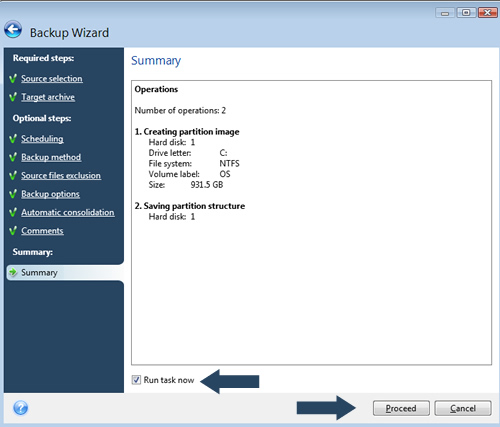
11. Make sure the “Run task now” box is checked, and then click on “Proceed”
12. You will then see a status bar showing you the progress of your backup. When the backup generation is complete, a confirmation will appear on screen and you can unplug your external hard drive, safe in the knowledge you have a full backup incase of a system, or hardware failure.
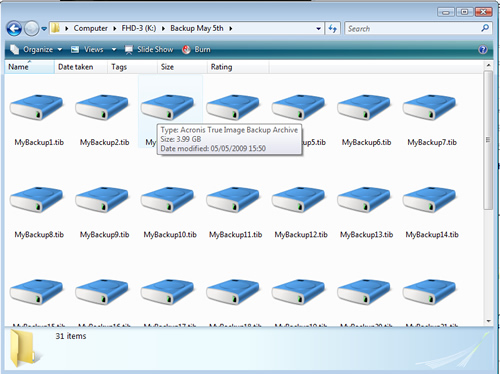
If you want to confirm everything has been backed up correctly, just open up your external drive and locate where you saved the backup. You should then be able to see your backup archives in all their glory!
So that’s the backup out of the way, even if you don’t think a system failure or hard drive combustion (can a hard drive combust?) will ever happen to you, I’d urge you all to make a full backup of your system! It only takes a few minutes to start the backup process, and it will save you LOTS of hassle if your computer goes belly up like mine did. With a full system backup you can restore everything to exactly how it was before a crash, you don’t need to reinstall any programs or operating systems!
Anyway, back to my story. If you have a short attention span, here’s where we are at:
One of my hard drives failed, so I made a full system backup onto an external hard drive.
The next step was to replace the faulty drive.
As I had a RAID 0 setup, which in very basic terms is a bit like having 2 disks running as 1, doubling your disk space. The new disk would need to be a replica of the other disk – or so I was told!
So I decided that instead if replacing just the faulty hard drive, I would replace both of them with brand new drives, in the process I’d increase the disk space on the computer from 300GB to 1TB, hard drives are dirt cheap now so it seemed silly not to. A good UK supplier of all things hardware related is CCL Online, I get all of my computer “bits” from there. So if you are after a new external or internal drive I can highly recommend them.
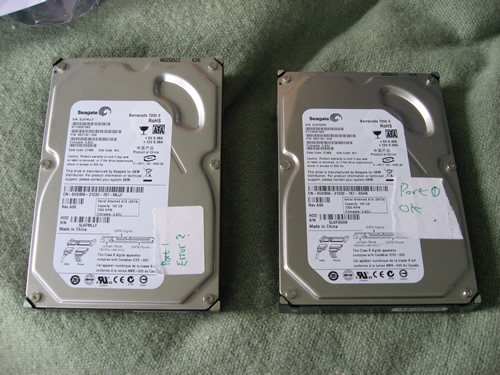
My new drives arrived the next day, so my next task was to remove the 2 old drives and replace them with the new ones. When I was taking them out, I made sure to make a note of which was the faulty drive so I could keep the remaining good drive for future use.
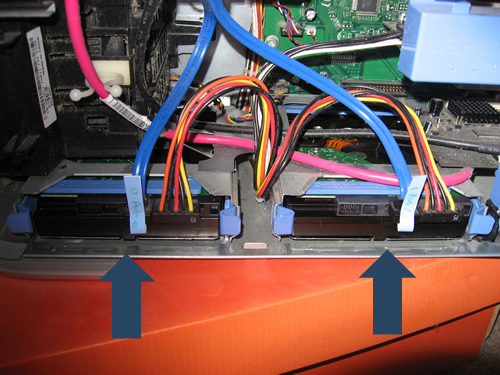
The actual installing of the new drives is pretty simple, although I suppose it all depends on your PC case. From the image below, you can see that my 2 drives are at the bottom of the case, and slide in and out. Yours may be positioned in a different place but the general idea is the same. You need to slide out the dock, and unscrew the old hard drive, replacing it with the new one. You’ll then have 2 connections going into the drive, the blue connector you can see on the image is the SATA cable that will go into your motherboard, and the wider, multi-coloured cable is the power cable, and this goes into the power supply.
**Top tip**
If one of your leads going into the hard drive is a wider, white/cream coloured cable then you will have an IDE hard drive, and not SATA, so bear that in mind if you are looking to replace a drive!
When you have ensured that your new drives are in place, you can turn on your computer. This next step depends on your computer setup, but you may be able to see a screen showing you the drives that are installed on your computer. As you can see from the image below, both of my new drives appear:

There are then 2 ways to do the next step. If you think about it, you’ve now got a brand new drive installed, but the drive is clean, it has no data on it at all – not even an operating system.
So here are your 2 options:
1. Reinstall windows using your boot CD
2. Use the Acronis boot disk to restore everything
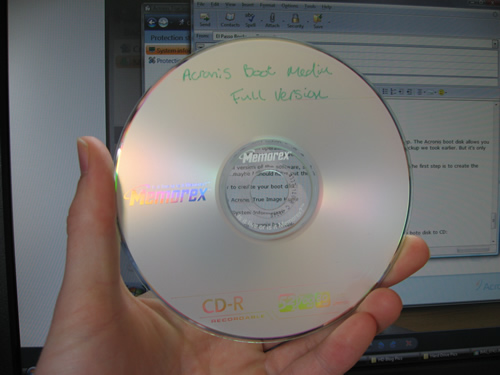
Option 2 is the quickest option, as it allows you to skip the reinstall windows step. The Acronis boot disk allows you to boot up, without an operating system, and restore your computer from the backup we took earlier. But it’s only available if you purchase the full version of the software, not the 15 day trial.
I own the full version of the software, so I’ll show you how to use the boot disk. The first step is to create the rescue disk..maybe I should have put this further up in the article 🙂
Here’s how to create your Acronis boot disk:
1. Open up Acronis True Image Home
2. Click on “System Information”
3. Click on “Create Acronis bootable media”
Go through the Wizard clicking “Next” when prompted, and you can then burn the boot disk to CD (or DVD):
You should now have either your Acronis rescue boot disk, or your Windows boot disk ready to go.
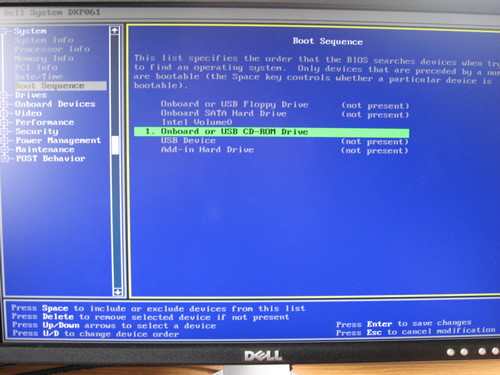
So the next thing you need to do is go into the BIOS and change the primary boot device to your CD/DVD drive, this will allow us to boot using the CD.
The way to do this will vary depending on the BIOS your are using, I’m using a Dell Dimension 9200 Desktop PC with the DXP061 BIOS…at least that’s what it said on the screen 🙂
To get into the BIOS on a Dell PC, power up the PC and keep tapping the F2 key until the blue screen appears.
When the blue screen appears, use the arrow keys on your keyboard to go down to the “Boot Sequence” option, push “Enter” on your keyboard, then move down to “Onboard or USB CD-ROM Drive” and push the space bar on your keyboard to set it as the primary boot device. You can then insert your CD (Windows or the Acronis boot CD), save the changes and then exit.
**Top Tip**
Before changing the order of the boot sequence, make a note of the old boot sequence then you can easily change it back when we are done!
When the computer reboots, it will boot using the CD you just entered in the drive. If you are reinstalling Windows go through the installation process to do a clean install, once installed, you can download the free 15 day trial of Acronis True image home. If you open it up we can then restore the backup we took earlier, as shown below.
Using the Acronis boot disk means we can skip the above step, and get straight down to restoring our backup.
To restore the backup using Acronis True Image Home 2009:
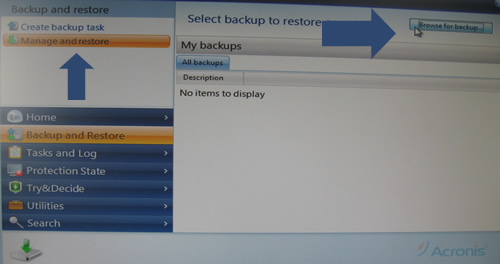
1. Click on “Backup and Restore”
2. Click on “Manage and Restore”
3. Click on the “Browse” button to locate the backup we saved on our external drive
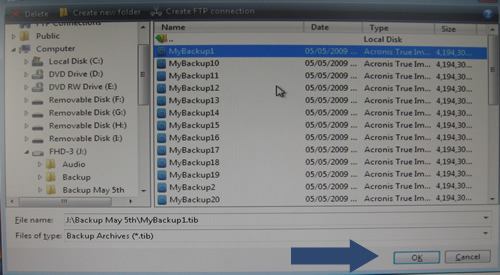
4. When you’ve found the backup, click on one of the archives and click on “OK”
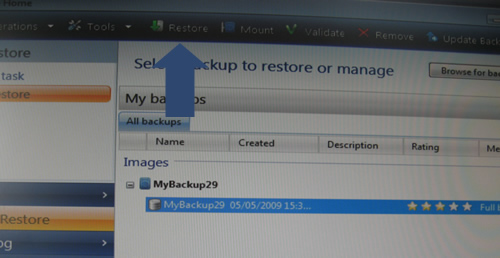
5. You’ll then see a summary of the backup, click on the backup and then click on the “Restore” icon towards the top of the page. Apologies for the quality of these pictures by the way, they were taken using my digital camera as I was doing the backup of my own PC!
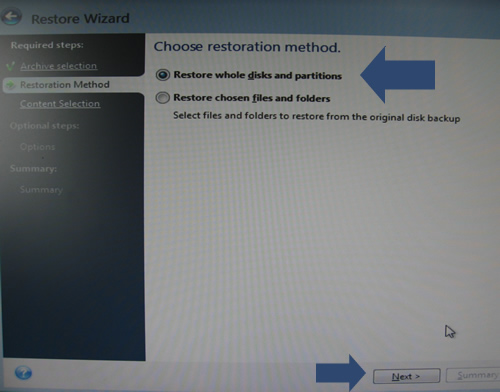
6. You can then choose the restoration method, you can either restore individual files and folders, or you can do a full restore. This restores your computer back to the exact state it was in when you took the backup, this includes absolutely everything!
Select “Restore whole disks and partitions” and click on Next.
8. The next step asks us where we’d like to restore the data to, we need to select the new drive (or drives) that we have just installed. Select the new drive and click on Next.
If you have chosen to go down the Windows reinstall route, you may see a warning saying that the drive contains useful data, and restoring the backup will delete that data. If the message appears, click on “OK”.
You will then be shown a summary of the actions that will be taken, click on “Proceed”.
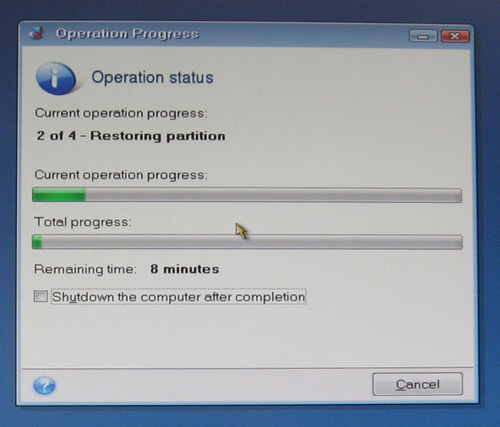
Your computer will then reboot and the restore process will begin, you’ll be able to see a dialog box showing you the progress of the restoration.
When this is complete, your computer should boot back up as normal and will be in the same state it was when you took the backup, but this time you’ll be running on a new hard drive and not the old faulty one 🙂
**Top Tip**
Remember to go back into your BIOS and set the boot sequence back to normal, this will ensure you don’t keep booting from the CD each time you turn on your computer!
So, in a nutshell, that’s how you make a full system backup of your computer, and how you restore it. It’s a very simple task as long as you are using Acronis True Image Home, there is a 15 day free trial but I purchased the full version, it’s worth it just to be able to create the rescue boot disk…
But I’m not done yet.
This next step might not apply to you, but I’ve got some screenshots so I may as well use them 🙂
My computer was now restored to it’s old state, Windows Vista home was running as normal, and all of my installed programs were intact, but I did have one small problem.
As the new hard drives I had installed had a larger capacity than the old drives I removed, I needed to resize the partition so I could use the new space I had gained from changing the drives. When I restored using True Image home, it restores a full image of the old hard drive, including the drive size.
So I needed to resize the partition.
Normally doing this would mean a loss of data, but luckily I found some more Acronis software to use. I used the Acronis Disk Director suite, to quickly and easily increase the size of the partition, without losing any of the data I had just restored.
To increase the size of a hard drive partition, without losing any data:
1. Open up Acronis Disk Director Suite
2. Click on the partition size you want to increase
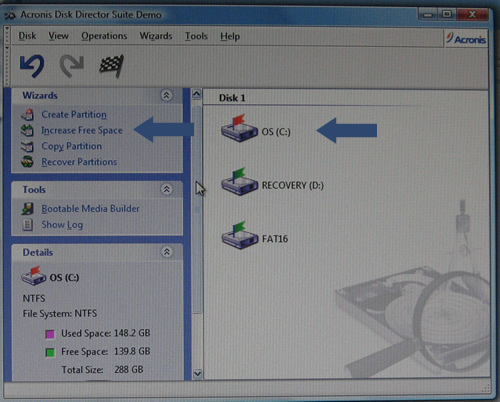
3. Click on the “Increase free space” icon
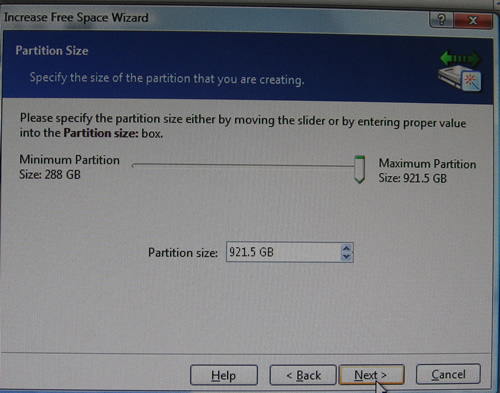
You will then be presented with an easy to use Wizard, go through the wizard until you get to the screen below, this then allows you to resize the partition. You can either take the space from another partition, or you can use the un-used space on the drive. (This is what I did)
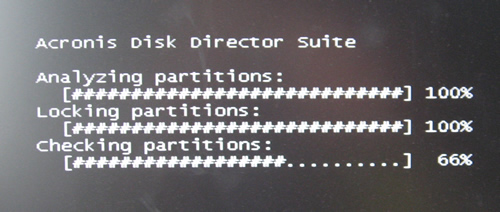
When you have gone through the Wizard, you’ll see a confirmation on screen of the tasks that will be undertaken. When you are happy with this, click on the “Commit” button, your computer will then reboot and the changes will be made.
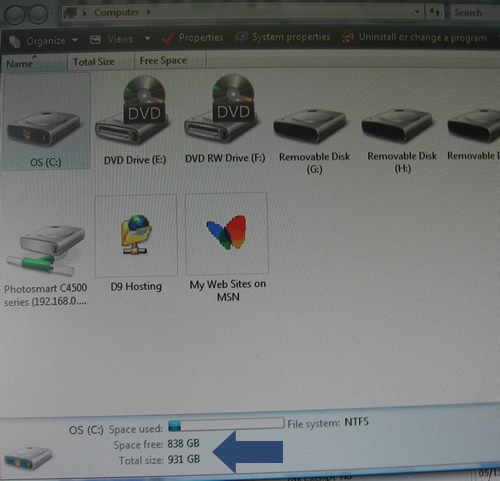
When you reboot, and go into “My Computer” you should be able to see that the size of the disk has been changed, and the software has done it’s job correctly 🙂
And there you have it, what started out as a simple blog post has morphed in what seems to have been one of my longest posts ever. I should really have turned it into an eBook…maybe I still could, but I think it should prove to be a very useful free resource. If something like this existed when my hard drive died it would have saved me a lot of research time, so hopefully it will help someone out there do the same.
So thanks for reading, and let me know if you have any comments or questions.
*Update*
You’ve probably already guessed that the links to the software I used ARE affiliate links…I need to get something out of the hours of typing don’t I? 😉
But when I signed up to the affiliate program, they did send me a list of coupon codes that can be used against all Acronis products. I don’t know if they will keep sending me new coupons each month, as the coupons I have at present are for May 2009 only, so I’ve listed them all in a section on the blog, and I’ll update it with more Acronis coupon codes if and when I get them.
Thanks for reading,
Dan
How To Edit Your WordPress Blog Theme
Hello everyone, today I’ll cover a subject that has been requested by a lot of you for a very long time. So I’ve decided to get my screen shot head on and give you what I believe to be a pretty comprehensive guide on how to edit your WordPress blog theme.
Before you start reading this guide, please ensure that you make a backup of any files BEFORE you modify them, if you don’t make a backup and then mess up your theme you will be in a bit of a pickle 😉
So, I don’t think we need any more of an introduction so lets make like Abi Titmuss and get on with it.
Step 1
The first thing you need to do is to decide what it is that you want to edit; do you want to add an email opt-in box to the sidebar, or would you like to customize the comments section?
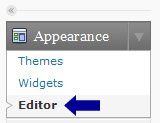
It doesn’t matter what part of the blog you wish to edit, you’d start off in the same way. The first thing you need to do is to log into your WordPress admin area and go into the “Theme Editor”. You can find this down the left hand side of the page.
Step 2
Next you will be able to see a screen that looks similar to the image below:
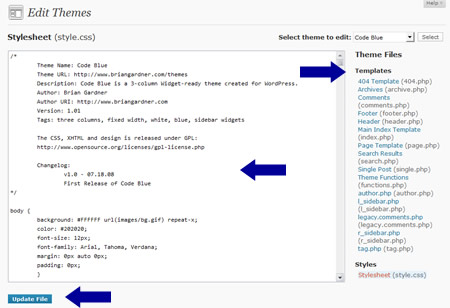
In the main part of the screen you’ll be able to see a big white box with some sexy code in it, and to the right of the page you’ll see a list of all files that make up your WordPress theme. Each file controls a different part of the blog, don’t worry if you have more or less files than in the screen shot above, each theme is different and they will have different files and filenames.
They should however have names that allow you to get a rough idea of which part of the blog the file pertains to.
##############################
Top Quality WordPress Blog Hosting
D9 Hosting offers ultra-reliable WordPress
blog hosting to all customers. Our server
load averages are stable at under 0.50%
on all existing servers!
See What Our Customers Say About Us >>
##############################
Step 3
Now that you know how you can edit the files, you need to check out which file pertains to the part of the blog you wish to edit. With a bit of common sense and trial and error you’ll be able to find it in no time.
In this example I want to edit my sidebar. If you look at my list of files you can see I have two that could pertain to the sidebar – l_sidebar.php and r_sidebar.php
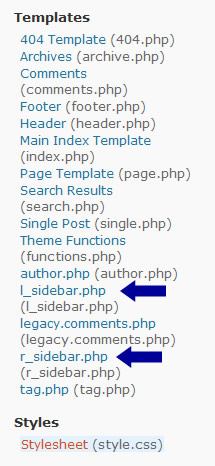
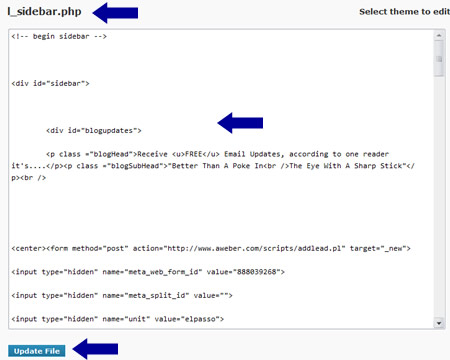
All I’m going to do is click on the l_sidebar.php file, and the file will then be opened in the big white box to the left of the page.
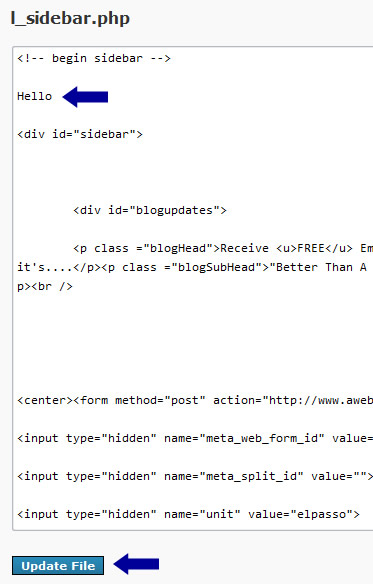
All I am going to do now is enter some random text in the file; for this example I will just type “Hello” and then I will click on the “Update File” button.
Step 4
What you need to do now is visit your blog, and then go on a hunting trip to find the “Hello” that you just entered in the file. When you find the “Hello” on your blog, you can get a visual idea of what you’ve just done:

You can see that “Hello” has appeared at the top of the page. But it’s slightly too high, I want to move it down slightly.
So all I need to do is go back into the theme editor, and back to the l_sidebar.php file. I’m then just going to move the “Hello” down under the <div id=”sidebar”> statement.
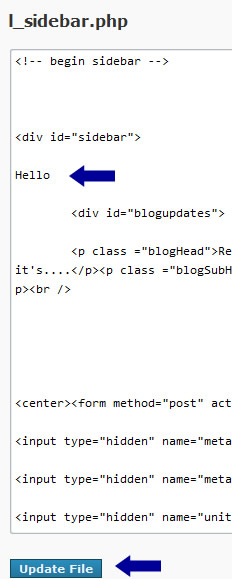
Step 5
When you have moved your identifying text (Hello in this example) Â and saved the file, go back to your blog and you’ll notice that the text has moved. In my example it’s slightly lower down the page than it was before:
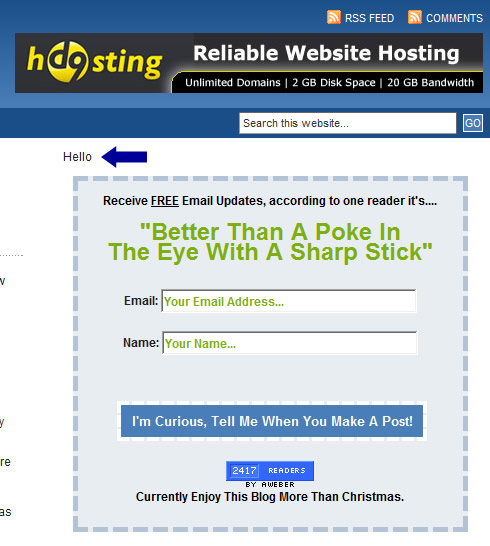
Once you have done this a few times, you’ll be able to find the ideal place that you want your new content to appear. So all you’d need to do is replace your text (Hello in this example) with your custom content!
So just to go a bit further and show you a bit of customization “in action”, you’ll notice at the bottom of each of my single posts I have box prompting you to join my mailing list:

To add this, I edited the “single.php” file, don’t worry if you don’t have one in your theme. Just have a look around and you’ll be able to find which file pertains to that part of the blog.
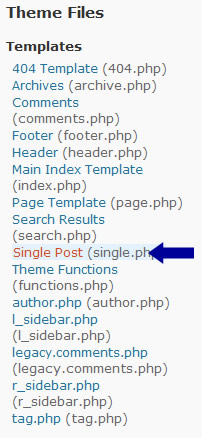
I then added the code for the table; which you can see between the 2 blue arrows in the image below and clicked on the “Update” button.
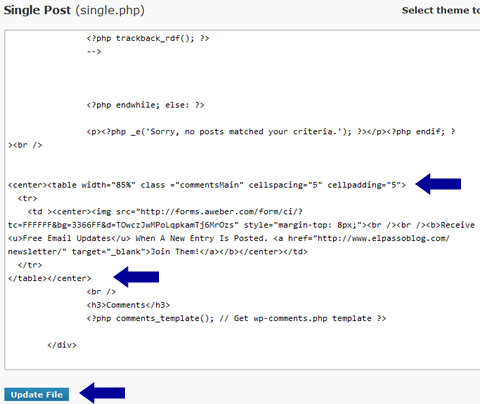
And that, in a nutshell, is how you edit your WordPress blog. It helps if you have a bit of basic coding knowledge as you’ll be able to find which bits to edit a lot quicker, but even if you are a web design newbie you should be able to figure it out with a bit of trial and error.
And just before I go, here’s an added bonus lesson for you –
How To Add An Opt-In Form To The Code Blue Sidebar
Now if you don’t already know, “Code Blue” is the theme that I use for this blog. It’s a very popular theme and is made by IMHO the best WordPress theme designer around Brian Gardner.
A lot of you have asked how I got my opt-in box in the top left, so here’s how to do it.
Step 1
Open up the “l_sidebar.php” file in the WordPress theme editor and look for the <div id = “sidebar”> code, under that we are going to create a new DIV in our stylesheet called “blogupdates”, so enter the following under the sidebar code:
<div id = “blogupdates”>
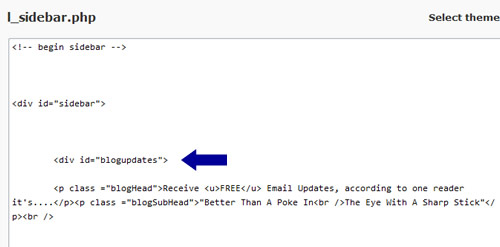
Step 2
We should really have done this bit first but never mind, we’ll get to the same end point 😉
All you need to do now is create the DIV in your stylesheet, so in your theme editor, open up your stylesheet and add the following code to the bottom of the file:
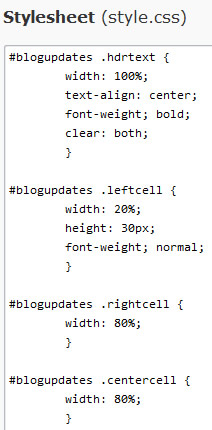
Save the files when done.
Step 3
Go back into the editor and open up l_sidebar.php
Under the <div id = “blogupdates”> that you just added, you need to enter the code for your opt-in form, and the end of the code close the DIV and you are done!
So it should look like this:
<div id = “blogupdates”>
Opt-in code goes here
</div>
Just a quick note to say please don’t copy/paste any code direct from this blog, WordPress tends to screw up the quotation marks, so you are better off typing out the code manually and not copy/pasting!
And that brings to an end a monster of a blog post, I didn’t know I’d taken so many screen shots, I should have made it into a $7 eBook or something!
As always please leave any comments or questions, I think I’m off for a lay down 😉
The Last Post Of 2008
It’s the 23rd of December, and relatives have started to appear at random unannounced intervals, some come bearing gifts, others do not. It can only mean one thing – it’s Christmas!
It’s the annual event that allows me to break away for the computer (for a couple of hours at a time anyway!) Â and argue with family members:
Dan: “I’m watching TV, play on the xbox later”
Dan’s Brother: “Shut up, you always get to watch TV”
Dan: “Move the xbox into your bedroom”
Dan’s Brother: “Know you are said you are but what am I”
Dan: “What?”
Dan’s Brother: “Know you are said you are but what am I”
And repeat for 7 days.
Despite the constant arguing I do tend to use Christmas as a bit of a break, I do answer emails and support requests, but I won’t be doing any blog or website updates until after the 1st January 2009, so this is going to be the last post of 2008!
As I feel it’s been a good year content wise for this blog, I’m going to show you a blog post that is almost a year old and that will be very useful for you at this time of year.
The post shows you how to automatically update your Copyright notices so they show the correct  Year. Check it out here:
An Easy Way To Change Website Copyright Dates
That’s all I have for today, all that’s left is for me to thank every single one of you that’s read the blog, or purchased any of my products in the past year, have a very Happy Holiday season and I’ll be back to inform/entertain/bore/annoy you in 2009!
Have a good one!
Dan
How To Sell & Publish Your Books On Amazon.com
It seems that one of life’s greatest mysteries is:
“How Do I Get My Own Book Published?”
Statistics show that the vast majority of people feel they have at least one book in them, but they have no idea how to find a publisher.
Thankfully since the dawn of the Internet things have become a lot easier. There are now services out there that will help you turn your own master-pieces into physical paperback, or hardback books that can be sold in the world’s biggest online market places including Amazon, Barnes & Noble, and Waterstones.
In dead simple terms, here is how you do it:
1. Write the book
The first step is to write your book. I find the easiest way is to open up your favorite word processor (Microsoft Word, Open Office Writer, etc.) and get typing! If you set yourself a target of so many pages/chapters each day, you’ll be surprised at how quickly things start to take shape.
2. Format the book
Add some pictures if you wish, insert a contents page and generally “jazz up” Â the layout of your book. Make each chapter start on a new page, make the main headings bold and use a different font to make them stand out just that little bit more.
If you a stuck for ideas, just read some of your favorite books and take note of how they format everything.
3. Send  the book to your publisher
Yes, you already have a publisher waiting to accept your book, and you didn’t even have to leave the PC (or MAC, I’m all for equality!) screen.
At present your book is still in digital form, so it’s known as an eBook, or e-Book depending on how pedantic you want to be. But whichever way you spell it, you need to upload your eBook to the publisher. And that’s actually pretty much it, you can now sell your book online, and the publisher will print and ship the book for you, but now the best bit.
4. How to sell your book on Amazon & Other online book stores
All you need to be able to sell your book on Amazon is an ISBN number. Again, it’s dead simple – get your publisher to do it for you!
The publisher is able to give you all the help you need when it comes to getting an ISBN number for your book, as well as selling your creation on Amazon. They’ll even take care of the distribution side of things for you!
So in 4 easy steps, that’s how you sell your book on Amazon. It can actually be done in less than an hour assuming you’ve already written your book 🙂
Of course, I’ve shown you everything in it’s most basic form, there are of course a lot more questions that you’d need answers to before you can become the next JK Rowling, things like:
- How to generate sales of your book
- How to find the publisher
- How to get the ISBN number
- The formatting limitations for a hardback/paperback book
- What size do your images have to be?
- How to do you make a professional front and back cover for the book?
- How do you break into the Amazon worldwide marketplace
- Can you use PLR (Private Label Rights) material?
- How to turn any existing eBook into a physical book
- And so on…
If you are at all interested in publishing your own book, then I strongly recommend you check out “Ebook 2 Book”. All of the bullet points and steps that I mentioned above are covered in the guide, and it really will save you hours, if not days of research time!
Click Here To View Ebook 2 Book
A Step By Step Guide To Publishing Your Own Book/eBook On Amazon


