My PPC Web Spy Case Study
It’s free, it’s made by Brad Callen, it’s free, it allows you to legally steal your competitors keywords, it’s free, the upsell is interesting, it’s free and…it’s free, so what’s the catch?
Well, there isn’t one really. It’s actually a very cool free tool that can be very powerful – as I’m about to demonstrate, the only questionable thing would be the morality of stealing/spying on your competitors keywords.
I’ll leave you to make your own minds up about the moral aspects of it, but I find it very useful. So here’s a quick case study I’ve done using PPC Web Spy and everyones favourite boring, generic niche – WEIGHT LOSS! 🙂
So the first thing to do (After you’ve installed PPC Web Spy of course) is to do a search on Google for the niche you are working in. In my example I’ll search for “Weight Loss”.
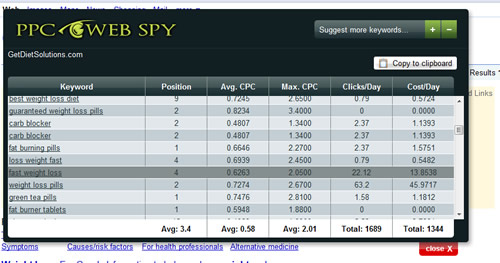
You’ll then see that we get a lot of “Sponsored Ad’s” and under each of these ads is a green “View Keywords” button. If you click on this button it allows you to view a list of all keywords the website is bidding on, how much it is costing them and how many clicks they can expect to receive on a daily basis.
Here are the results I get for the #1 “Weight Loss” ad on Google.
You can see that the site is bidding on loads of different keywords, so from that you can take a closer look at each of the keywords and see which would relate to your site. You can also find even more keywords by searching for one of the keywords brought back by PPC Web Spy.
I’ll show you an example.
One of the keywords the site was bidding on is “Tonalin”; now I have no idea what this is, apologies if it’s something rude, but it’s a good example to use.
So all I’ll do is go back to Google and search for “Tonalin”.
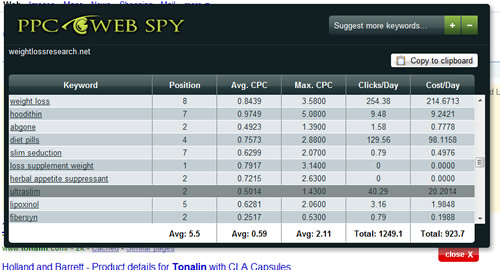
You can see there are a lot of sponsored ads, and we can then view the keywords using PPC Web Spy.
This time I’ll check out the 2nd site, and as you can see from the screen shot below, it brings back even more keywords for me to look through. I’m in weight loss keyword heaven – if only I had a weight loss product I’d be rich! 🙂
So that’s a very quick example of how the free PPC Web Spy tool could help you. I’ve used the weight loss niche but you’d obviously use it on whatever niche you worked in. You could also use it to research any new potential niches by looking at the estimated clicks and the daily costs.
There is also a VERY interesting upgrade available that again, may be slightly immoral for some of you so I’ll leave you to make your own minds up about it!
So now you know how it works, click here to download PPC Web Spy for FREE!
How To Edit Your WordPress Blog Theme
Hello everyone, today I’ll cover a subject that has been requested by a lot of you for a very long time. So I’ve decided to get my screen shot head on and give you what I believe to be a pretty comprehensive guide on how to edit your WordPress blog theme.
Before you start reading this guide, please ensure that you make a backup of any files BEFORE you modify them, if you don’t make a backup and then mess up your theme you will be in a bit of a pickle 😉
So, I don’t think we need any more of an introduction so lets make like Abi Titmuss and get on with it.
Step 1
The first thing you need to do is to decide what it is that you want to edit; do you want to add an email opt-in box to the sidebar, or would you like to customize the comments section?
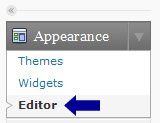
It doesn’t matter what part of the blog you wish to edit, you’d start off in the same way. The first thing you need to do is to log into your WordPress admin area and go into the “Theme Editor”. You can find this down the left hand side of the page.
Step 2
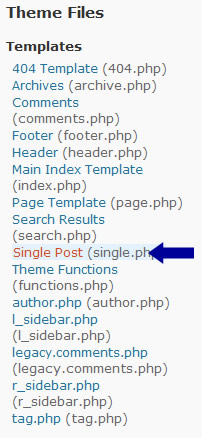
Next you will be able to see a screen that looks similar to the image below:
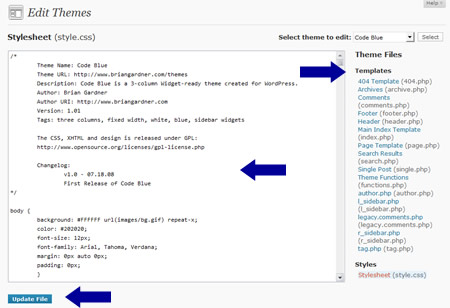
In the main part of the screen you’ll be able to see a big white box with some sexy code in it, and to the right of the page you’ll see a list of all files that make up your WordPress theme. Each file controls a different part of the blog, don’t worry if you have more or less files than in the screen shot above, each theme is different and they will have different files and filenames.
They should however have names that allow you to get a rough idea of which part of the blog the file pertains to.
##############################
Top Quality WordPress Blog Hosting
D9 Hosting offers ultra-reliable WordPress
blog hosting to all customers. Our server
load averages are stable at under 0.50%
on all existing servers!
See What Our Customers Say About Us >>
##############################
Step 3
Now that you know how you can edit the files, you need to check out which file pertains to the part of the blog you wish to edit. With a bit of common sense and trial and error you’ll be able to find it in no time.
In this example I want to edit my sidebar. If you look at my list of files you can see I have two that could pertain to the sidebar – l_sidebar.php and r_sidebar.php
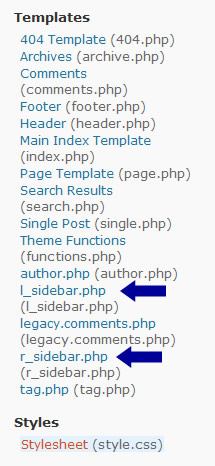
All I’m going to do is click on the l_sidebar.php file, and the file will then be opened in the big white box to the left of the page.
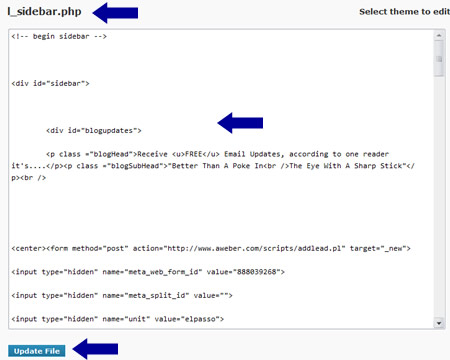
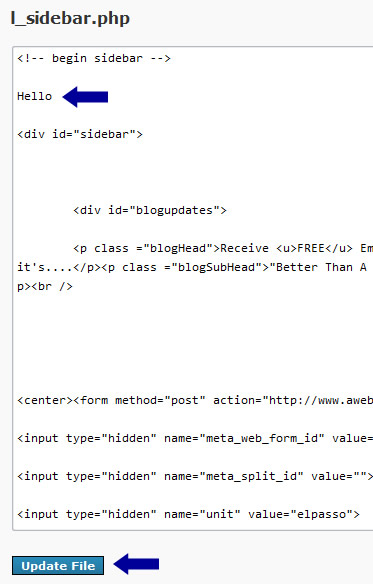
All I am going to do now is enter some random text in the file; for this example I will just type “Hello” and then I will click on the “Update File” button.
Step 4
What you need to do now is visit your blog, and then go on a hunting trip to find the “Hello” that you just entered in the file. When you find the “Hello” on your blog, you can get a visual idea of what you’ve just done:

You can see that “Hello” has appeared at the top of the page. But it’s slightly too high, I want to move it down slightly.
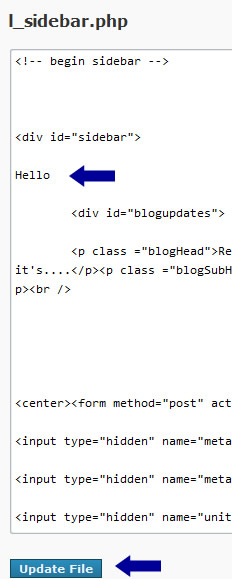
So all I need to do is go back into the theme editor, and back to the l_sidebar.php file. I’m then just going to move the “Hello” down under the <div id=”sidebar”> statement.
Step 5
When you have moved your identifying text (Hello in this example) Â and saved the file, go back to your blog and you’ll notice that the text has moved. In my example it’s slightly lower down the page than it was before:

Once you have done this a few times, you’ll be able to find the ideal place that you want your new content to appear. So all you’d need to do is replace your text (Hello in this example) with your custom content!
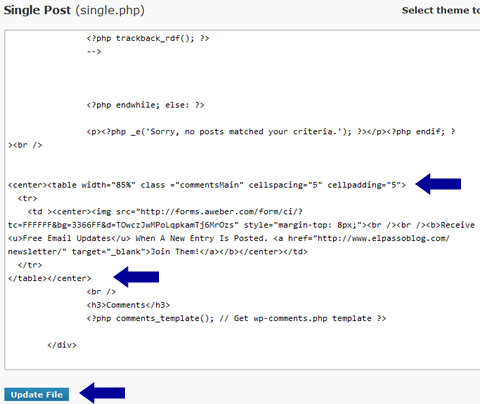
So just to go a bit further and show you a bit of customization “in action”, you’ll notice at the bottom of each of my single posts I have box prompting you to join my mailing list:

To add this, I edited the “single.php” file, don’t worry if you don’t have one in your theme. Just have a look around and you’ll be able to find which file pertains to that part of the blog.
I then added the code for the table; which you can see between the 2 blue arrows in the image below and clicked on the “Update” button.
And that, in a nutshell, is how you edit your WordPress blog. It helps if you have a bit of basic coding knowledge as you’ll be able to find which bits to edit a lot quicker, but even if you are a web design newbie you should be able to figure it out with a bit of trial and error.
And just before I go, here’s an added bonus lesson for you –
How To Add An Opt-In Form To The Code Blue Sidebar
Now if you don’t already know, “Code Blue” is the theme that I use for this blog. It’s a very popular theme and is made by IMHO the best WordPress theme designer around Brian Gardner.
A lot of you have asked how I got my opt-in box in the top left, so here’s how to do it.
Step 1
Open up the “l_sidebar.php” file in the WordPress theme editor and look for the <div id = “sidebar”> code, under that we are going to create a new DIV in our stylesheet called “blogupdates”, so enter the following under the sidebar code:
<div id = “blogupdates”>
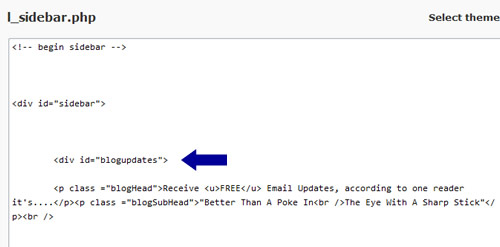
Step 2
We should really have done this bit first but never mind, we’ll get to the same end point 😉
All you need to do now is create the DIV in your stylesheet, so in your theme editor, open up your stylesheet and add the following code to the bottom of the file:
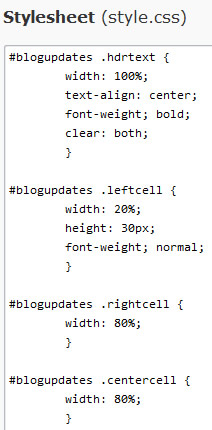
Save the files when done.
Step 3
Go back into the editor and open up l_sidebar.php
Under the <div id = “blogupdates”> that you just added, you need to enter the code for your opt-in form, and the end of the code close the DIV and you are done!
So it should look like this:
<div id = “blogupdates”>
Opt-in code goes here
</div>
Just a quick note to say please don’t copy/paste any code direct from this blog, WordPress tends to screw up the quotation marks, so you are better off typing out the code manually and not copy/pasting!
And that brings to an end a monster of a blog post, I didn’t know I’d taken so many screen shots, I should have made it into a $7 eBook or something!
As always please leave any comments or questions, I think I’m off for a lay down 😉


