How To Make A Full PC Backup And Restore After Hard Drive Failure
Wow, that’s a bit of a long title isn’t it. I wonder if the search engines will like it? At least it’s nice and descriptive!
This post is going to be another of my free “How To” guides, but this time I’m not going to be showing you anything Website, or Internet Marketing related. I’m going to show you how to do something everyone with a computer should do at some point – get a full backup of your computer!
I don’t just mean important files and your favourite holiday snaps, I mean a backup of EVERYTHING. Program files, Windows, System Files/Folders, hard drive partitions and so on. If you have a backup of absolutely everything on your computer, you are covered in the event of a hard drive failure and can be back up and running as if nothing has happened in a matter of minutes.
I haven’t just thought of this subject off the top of my head, I had a hard drive failure last week so whilst I did the backup/restore procedure I took some pictures so I could show you all how to make a full computer backup, and then restore it on a new drive if things go bad. Here’s the story.
I was happily working away one day, when suddenly the computer stopped responding. I had no choice but to do a hard power down. (Turn it off and on again!)
During the boot process, I was shown an error message saying that one of the hard drives installed on the computer was failing, and I should get a backup of everything ASAP.
So as soon as I saw that message, I booted up and generated a full backup using Acronis True Image Home – and I’m not just doing a sly bit of product placement here, I do actually use the software I’m recommending :-0
**Just a side point for any techie’s reading before you try and trip me up – the system has 2 drives in a RAID 0 setup, and 1 of the drives was in the process of failing, it hadn’t totally given up the ghost, hence I was able to boot up**
Don’t worry if the above paragraph goes over your head, it’s not important!
Of course if you run a backup, you need somewhere to store that backup. There’s no point running a backup and then saving it on the drive that is failing. So you really need another drive to store your backups on, I personally use an external USB hard drive. They are dirt cheap at the moment so there’s no excuse not to have one.
I flew through that section a bit, so here’s how to create a full system backup in some easy to manage steps:
*Before I start, I should point out that I’m running Windows Vista Home Edition. So if you are running XP home, professional, or have a MAC then the screens may look slightly different from how the appear on here*
1. Plug in your external USB hard drive (ignore this step if you are using an internal drive)
2. Open up Acronis True Image Home (15 day free trial available)
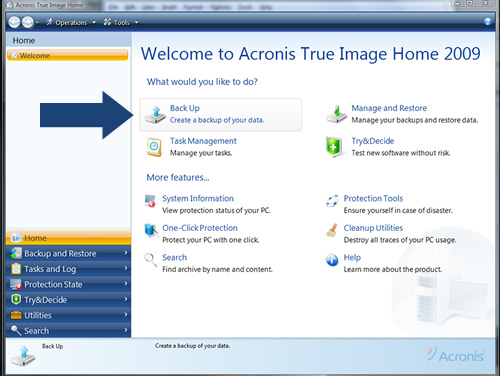
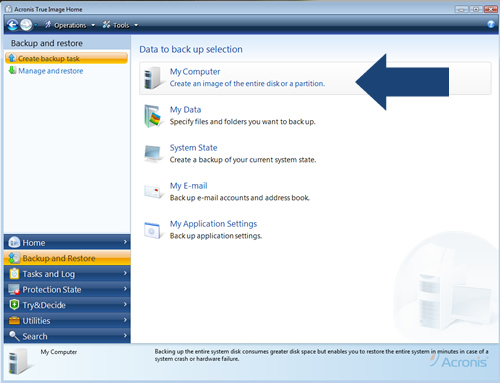
3. Click on the “Backup” Icon
4. Click on the “My Computer” icon to create a backup of the entire disk or partition
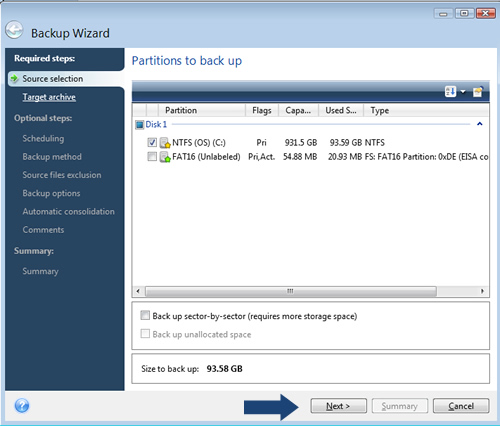
5. Select the disk you would like to make a backup of and click “Next”
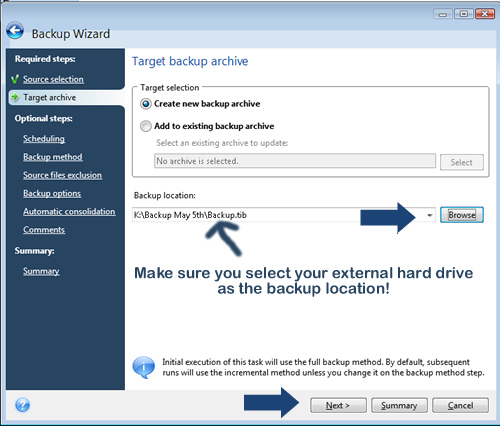
6. As this is your 1st backup, select the “Create new backup archive” option, and then click on the “Browse” button to locate your external drive. When you have selected a location to save the backup to (your external hard drive), click on “Next”
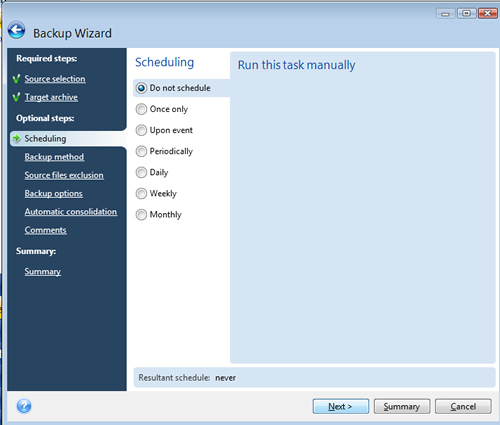
7. You will then be asked if you’d like to schedule the backup, at this time we want to create the back up right away, so select “Do not schedule”, but it’s worth remembering you can use the program to make an automated backup for you on a daily, or weekly basis.
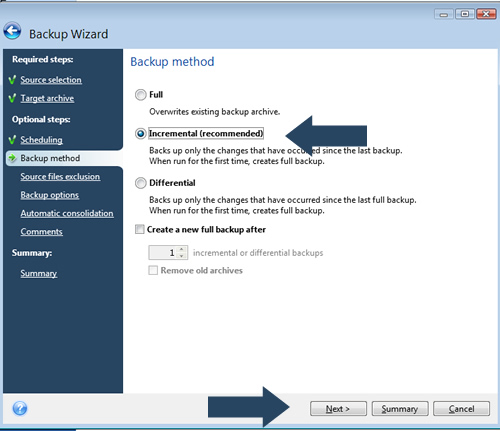
8. Next you are asked to select the backup method, as this is your first backup, you can select “Incremental”. This will create a full backup if it’s your 1st time (don’t be nervous), or if you are adding to an existing backup it will only backup the files that have changed since your last backup.
9. You can then choose to exclude certain files from the backup, this includes hidden files, system files, or any other filenames that you specify using custom criteria. As we want to backup absolutely everything, leave the boxes unchecked and click on “Next”
10. The next few steps can all be left as they are. So keep clicking “Next” until you get to the summary screen.
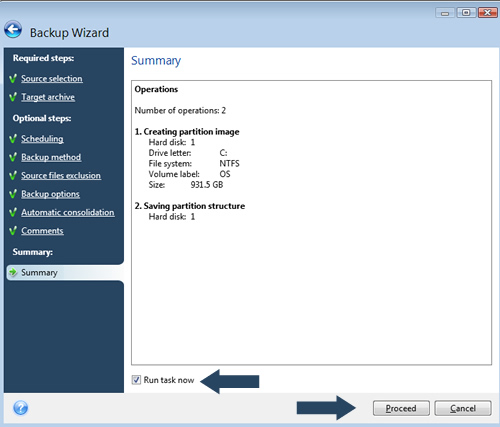
11. Make sure the “Run task now” box is checked, and then click on “Proceed”
12. You will then see a status bar showing you the progress of your backup. When the backup generation is complete, a confirmation will appear on screen and you can unplug your external hard drive, safe in the knowledge you have a full backup incase of a system, or hardware failure.
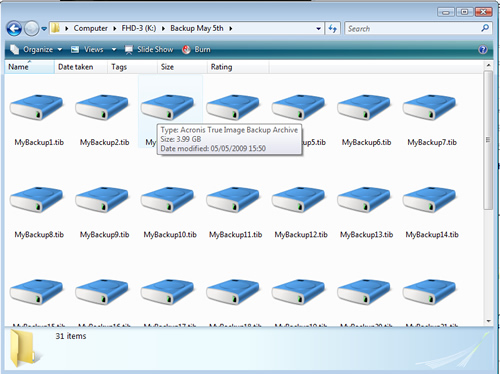
If you want to confirm everything has been backed up correctly, just open up your external drive and locate where you saved the backup. You should then be able to see your backup archives in all their glory!
So that’s the backup out of the way, even if you don’t think a system failure or hard drive combustion (can a hard drive combust?) will ever happen to you, I’d urge you all to make a full backup of your system! It only takes a few minutes to start the backup process, and it will save you LOTS of hassle if your computer goes belly up like mine did. With a full system backup you can restore everything to exactly how it was before a crash, you don’t need to reinstall any programs or operating systems!
Anyway, back to my story. If you have a short attention span, here’s where we are at:
One of my hard drives failed, so I made a full system backup onto an external hard drive.
The next step was to replace the faulty drive.
As I had a RAID 0 setup, which in very basic terms is a bit like having 2 disks running as 1, doubling your disk space. The new disk would need to be a replica of the other disk – or so I was told!
So I decided that instead if replacing just the faulty hard drive, I would replace both of them with brand new drives, in the process I’d increase the disk space on the computer from 300GB to 1TB, hard drives are dirt cheap now so it seemed silly not to. A good UK supplier of all things hardware related is CCL Online, I get all of my computer “bits” from there. So if you are after a new external or internal drive I can highly recommend them.
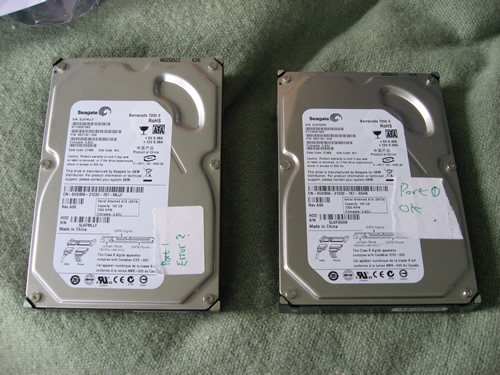
My new drives arrived the next day, so my next task was to remove the 2 old drives and replace them with the new ones. When I was taking them out, I made sure to make a note of which was the faulty drive so I could keep the remaining good drive for future use.
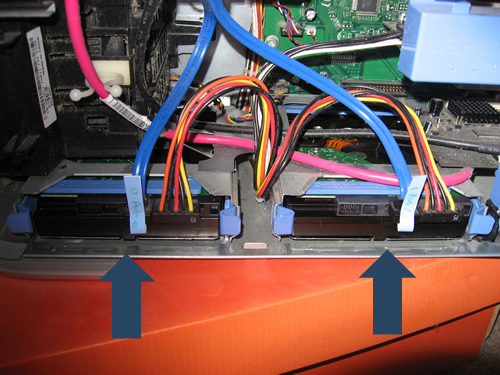
The actual installing of the new drives is pretty simple, although I suppose it all depends on your PC case. From the image below, you can see that my 2 drives are at the bottom of the case, and slide in and out. Yours may be positioned in a different place but the general idea is the same. You need to slide out the dock, and unscrew the old hard drive, replacing it with the new one. You’ll then have 2 connections going into the drive, the blue connector you can see on the image is the SATA cable that will go into your motherboard, and the wider, multi-coloured cable is the power cable, and this goes into the power supply.
**Top tip**
If one of your leads going into the hard drive is a wider, white/cream coloured cable then you will have an IDE hard drive, and not SATA, so bear that in mind if you are looking to replace a drive!
When you have ensured that your new drives are in place, you can turn on your computer. This next step depends on your computer setup, but you may be able to see a screen showing you the drives that are installed on your computer. As you can see from the image below, both of my new drives appear:

There are then 2 ways to do the next step. If you think about it, you’ve now got a brand new drive installed, but the drive is clean, it has no data on it at all – not even an operating system.
So here are your 2 options:
1. Reinstall windows using your boot CD
2. Use the Acronis boot disk to restore everything
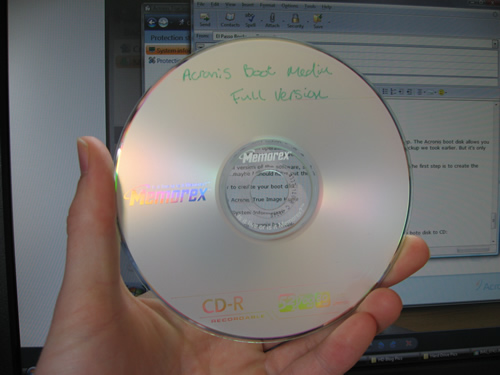
Option 2 is the quickest option, as it allows you to skip the reinstall windows step. The Acronis boot disk allows you to boot up, without an operating system, and restore your computer from the backup we took earlier. But it’s only available if you purchase the full version of the software, not the 15 day trial.
I own the full version of the software, so I’ll show you how to use the boot disk. The first step is to create the rescue disk..maybe I should have put this further up in the article 🙂
Here’s how to create your Acronis boot disk:
1. Open up Acronis True Image Home
2. Click on “System Information”
3. Click on “Create Acronis bootable media”
Go through the Wizard clicking “Next” when prompted, and you can then burn the boot disk to CD (or DVD):
You should now have either your Acronis rescue boot disk, or your Windows boot disk ready to go.
So the next thing you need to do is go into the BIOS and change the primary boot device to your CD/DVD drive, this will allow us to boot using the CD.
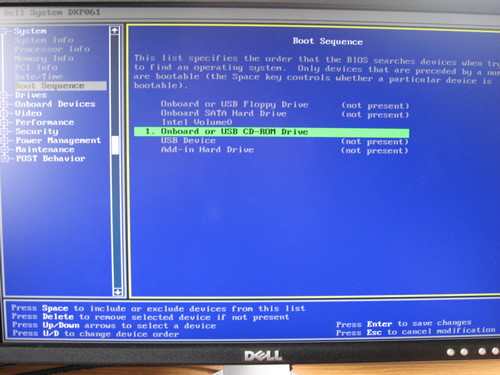
The way to do this will vary depending on the BIOS your are using, I’m using a Dell Dimension 9200 Desktop PC with the DXP061 BIOS…at least that’s what it said on the screen 🙂
To get into the BIOS on a Dell PC, power up the PC and keep tapping the F2 key until the blue screen appears.
When the blue screen appears, use the arrow keys on your keyboard to go down to the “Boot Sequence” option, push “Enter” on your keyboard, then move down to “Onboard or USB CD-ROM Drive” and push the space bar on your keyboard to set it as the primary boot device. You can then insert your CD (Windows or the Acronis boot CD), save the changes and then exit.
**Top Tip**
Before changing the order of the boot sequence, make a note of the old boot sequence then you can easily change it back when we are done!
When the computer reboots, it will boot using the CD you just entered in the drive. If you are reinstalling Windows go through the installation process to do a clean install, once installed, you can download the free 15 day trial of Acronis True image home. If you open it up we can then restore the backup we took earlier, as shown below.
Using the Acronis boot disk means we can skip the above step, and get straight down to restoring our backup.
To restore the backup using Acronis True Image Home 2009:
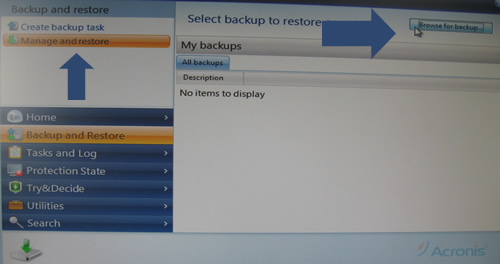
1. Click on “Backup and Restore”
2. Click on “Manage and Restore”
3. Click on the “Browse” button to locate the backup we saved on our external drive
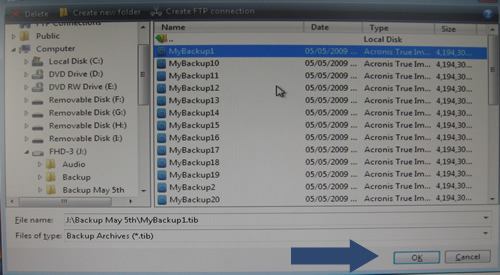
4. When you’ve found the backup, click on one of the archives and click on “OK”
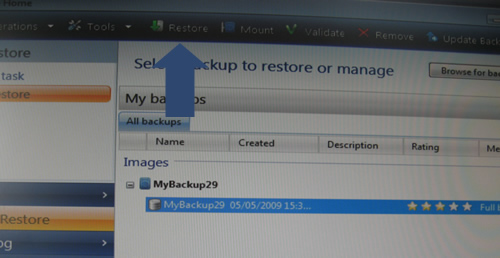
5. You’ll then see a summary of the backup, click on the backup and then click on the “Restore” icon towards the top of the page. Apologies for the quality of these pictures by the way, they were taken using my digital camera as I was doing the backup of my own PC!
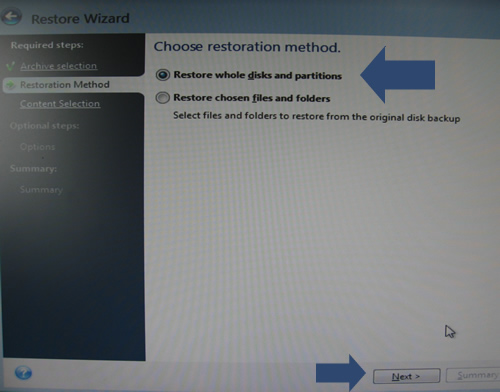
6. You can then choose the restoration method, you can either restore individual files and folders, or you can do a full restore. This restores your computer back to the exact state it was in when you took the backup, this includes absolutely everything!
Select “Restore whole disks and partitions” and click on Next.
8. The next step asks us where we’d like to restore the data to, we need to select the new drive (or drives) that we have just installed. Select the new drive and click on Next.
If you have chosen to go down the Windows reinstall route, you may see a warning saying that the drive contains useful data, and restoring the backup will delete that data. If the message appears, click on “OK”.
You will then be shown a summary of the actions that will be taken, click on “Proceed”.
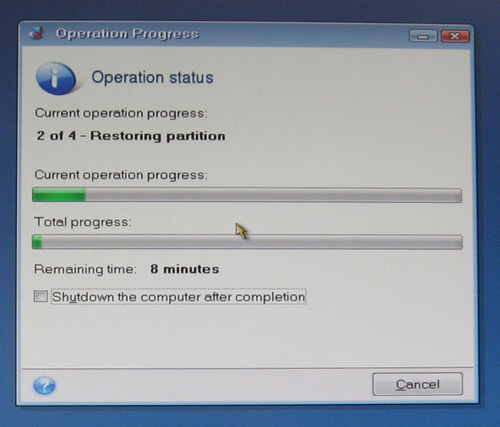
Your computer will then reboot and the restore process will begin, you’ll be able to see a dialog box showing you the progress of the restoration.
When this is complete, your computer should boot back up as normal and will be in the same state it was when you took the backup, but this time you’ll be running on a new hard drive and not the old faulty one 🙂
**Top Tip**
Remember to go back into your BIOS and set the boot sequence back to normal, this will ensure you don’t keep booting from the CD each time you turn on your computer!
So, in a nutshell, that’s how you make a full system backup of your computer, and how you restore it. It’s a very simple task as long as you are using Acronis True Image Home, there is a 15 day free trial but I purchased the full version, it’s worth it just to be able to create the rescue boot disk…
But I’m not done yet.
This next step might not apply to you, but I’ve got some screenshots so I may as well use them 🙂
My computer was now restored to it’s old state, Windows Vista home was running as normal, and all of my installed programs were intact, but I did have one small problem.
As the new hard drives I had installed had a larger capacity than the old drives I removed, I needed to resize the partition so I could use the new space I had gained from changing the drives. When I restored using True Image home, it restores a full image of the old hard drive, including the drive size.
So I needed to resize the partition.
Normally doing this would mean a loss of data, but luckily I found some more Acronis software to use. I used the Acronis Disk Director suite, to quickly and easily increase the size of the partition, without losing any of the data I had just restored.
To increase the size of a hard drive partition, without losing any data:
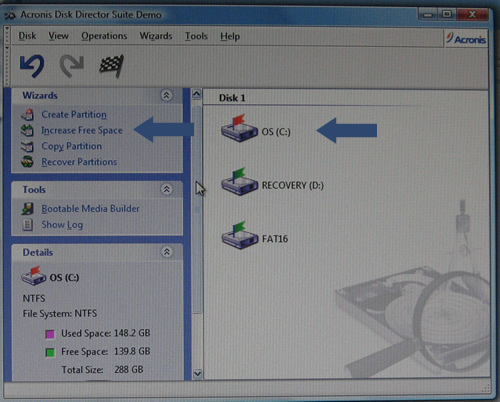
1. Open up Acronis Disk Director Suite
2. Click on the partition size you want to increase
3. Click on the “Increase free space” icon
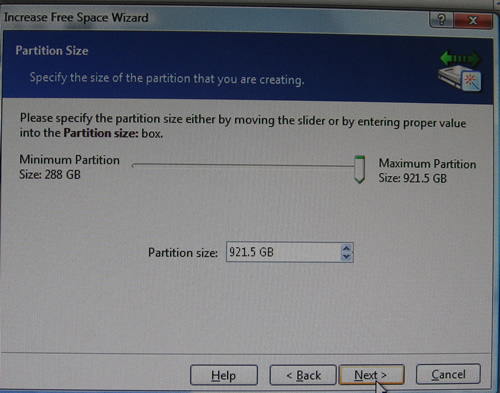
You will then be presented with an easy to use Wizard, go through the wizard until you get to the screen below, this then allows you to resize the partition. You can either take the space from another partition, or you can use the un-used space on the drive. (This is what I did)
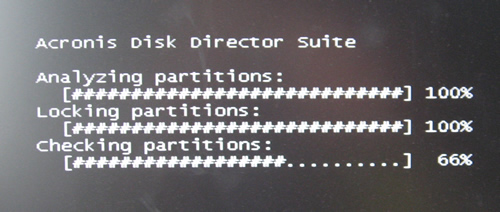
When you have gone through the Wizard, you’ll see a confirmation on screen of the tasks that will be undertaken. When you are happy with this, click on the “Commit” button, your computer will then reboot and the changes will be made.
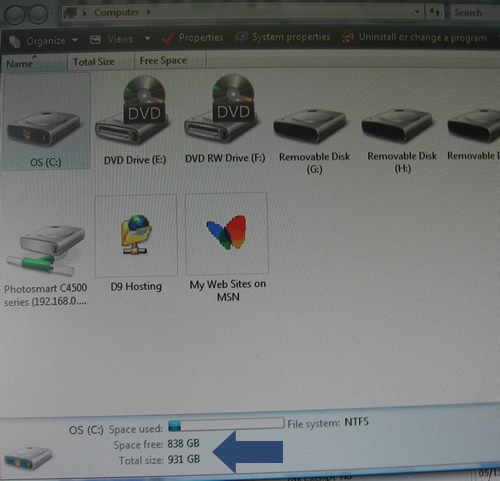
When you reboot, and go into “My Computer” you should be able to see that the size of the disk has been changed, and the software has done it’s job correctly 🙂
And there you have it, what started out as a simple blog post has morphed in what seems to have been one of my longest posts ever. I should really have turned it into an eBook…maybe I still could, but I think it should prove to be a very useful free resource. If something like this existed when my hard drive died it would have saved me a lot of research time, so hopefully it will help someone out there do the same.
So thanks for reading, and let me know if you have any comments or questions.
*Update*
You’ve probably already guessed that the links to the software I used ARE affiliate links…I need to get something out of the hours of typing don’t I? 😉
But when I signed up to the affiliate program, they did send me a list of coupon codes that can be used against all Acronis products. I don’t know if they will keep sending me new coupons each month, as the coupons I have at present are for May 2009 only, so I’ve listed them all in a section on the blog, and I’ll update it with more Acronis coupon codes if and when I get them.
Thanks for reading,
Dan
Receive Free Email Updates When A New Entry Is Posted. Join Them! |




Dan,
Thanks for the very helpful input. First class as always!
I speak as someone who has seen two BSODs (Blue Screen of Death) – one laptop and one desktop :o( Very depressing to put it mildly!
Best regards,
David
Wow Dan,
This should be an ebook not a blog post.
I’ll get some graphics for you and we’ll sell it!
LOL
O
LOL, good idea. I have plenty more un-used screenshots we can use for added value 😉
From my experience the BSOD is usually memory related, so replacing the RAM might do the trick, so you’d be able to get away without doing the backup.
It’s still one of the most annoying feelings in the world though when the blue screen appears and there’s nothing you can do 🙁
Perfect timing Dan! I just bought a new computer and have to copy my old hard drive to the new one. Thanks for a crystal clear explanation.
Vin
Dan, what’s the difference between incremental and differential backups?
Vin
Hi Vin,
That’s a very good question, from the descriptions they both sound exactly the same. At a GUESS I’d say they both do the same thing but in a different way….maybe…. 🙂
I wish I had this a few months back when I lost my HD. I did have all my files backed up on Mozy, but did lose some software programs. I am going to get an external and do this now that I know. Thanks so much for the info, Dan.
Aloha,
June
Awesome post Dan!
Here’s my first tip. We’ll do a cut 50-50.
WRITE THIS UP AS A WSO AS SOON AS YOU READ THIS AND MAKE $1,000+ IN THE NEXT 3 DAYS!
Tip 2 LIST THIS AS A $17 WSO WITHIN THE NEXT 6 HOURS.
PM me for where to send me the 50-50 cut.
Out of curiosity how long did Acronis take to BU the 92GB to the USB drive? And about how long did Acronis take to restore the 92GB back to the new HD?
I used to use Ghost but it was taking forever and ever to BU 900+GB.
Hi Mike,
A WSO is a good idea, thanks for the advice 🙂
I can’t remember the exact timing, I just set it running and then went off for some dinner! From memory the restore took longer than the backup, at a guess I’d say the backup took 2 – 3 hours and the restore took 4 – 5.
But that would depend on the spec of your PC and the amount of data you have to backup.
BTW, whatever happened to that black flash animation about the mysterious ebay seller that was forced deep underground and was hard to locate except for a special few. Modeled after the A Team. I miss that.
Haha, I had forgotten about that. I don’t even know if I have it on my PC any more, I’ll have to have a look round and upload it to the blog for prosperity!
Great post as always Dan. QUESTION: Mine is dying but there are viruses I can’t get rid of so I’m thinking I should NOT do a full backup. I don’t want the viruses on the new drives obviously. What would you recommend in this case?
Hi Robin,
As you say, there’s no point doing a full backup as when it comes to restoring you’d just restore the viruses as well.
I’d make a full backup, do a clean reinstall of windows, then just restore any important files.
Dan – Great post with clear explanations supported by screenshots. Fabulous! I liked it, You really did hard work as usual in compiling this lengthy post without missing any important step.
BTW – Just curious to know if the person in gravatar is real you? LOL – Which degree did you accept in such great pose 🙂
Seeing your expertise and honesty in sharing information, I am also contacting you via your contact form as I want to work with you on certain projects (provided you accept me as an affiliate). Writing it here to make 100% sure that you don’t miss my message.
Well…..the face is me, and the rest of the body is only me when I’ve had a few drinks 😉
I’ve received your mail, and will get back to you ASAP.
I am using Maxtor as my backup system which periodically reminds me to backup.
See more at http://www.maxtor.com/en/hard-drive-backup/external-drives/maxtor-onetouch-4-plus.html
Regarding eliminating viruses,spyware and malaware before backup this is also an ongoing process using Fix-it Utilities with Vista Home.
see more at http://www.avanquest.com/USA/pc-utilities/anti-virus-anti-spyware/complete-packages/Fix-It_Utilities_Professional.html
I am well satisfied and feel confident with these both to safeguard my precious files.
Dan,
In reference to the partitioning software, you can pull down a Live CD ISO of GParted, burn it to CD, then boot it as you specified in the article. It’s open source, works as well as, or better than, any other partition software I’ve used over the years – 1st experience was FDisk, 1985 or so. As long as you’re not rabidly anti-Linux, it has an easy-to-use GUI. One of the nicer things about it, compared to a few others, is that it allows resizing partitions w/o having to worry [too much] about losing files.
There are also some open source Live CD disk-imaging ISOs, but not having used them, cannot speak to their efficacy.
Thought I’d mention it … I’ve seen times when free was all I could afford .
Dan
I’ve been meaning to do a full system backup since my teenage son suffered a hard drive failure a few weeks back but had no idea where to start.
I followed your advice, picked up an external hard drive (500gb £53.79 at Argos with a free 2gb flash pen!) downloaded Acronis True Image and followed your screen shots and 20 minutes later I was done.
Thanks for giving me peace of mind, Dan
Stuart
http://www.printsmakeprofits.com Price slashed to celebrate its first birthday!
Cool, glad to be of service 🙂
Hi Dan, I just followed the link from the masterclass forum to this post.
This is an excellent post mate and so very helpfull. As soon as i get my PC back i will be following your guide step by step and will not have to suffer the agro of the last 2 weeks again.
Thanks Dan, you’re a top man.
Respect and Regards, Barry
No problem!
I htink is easier to use http://www.dmailer.com/dmailer-backup.html to backup and restore your data .
– Backup your data and store it safely online on their internet storage
– Format your computer and install other OS or what you want to do
– Download your backup and restore it.
I’ve used online backup services in the past, but upload speeds aren’t matched by peoples storage needs.
People are storing more and more on their computer, but upload speeds on standard Broadband connections are no higher than 1Mbps. So to upload even 100 GB of data to an online backup service would take an eternity.
If you then have to do a full restore you need to download the data from the server, using 100 GB as a very low example, that’ll take you over most providers monthly download limit, so you’d end up paying more for your broadband connection.
So I think the cheapest and quickest route would be to get an external hard drive, and back everything up to that. Then if things do go badly wrong, you can be back up and running in hours rather than days.
I used Acronis 2009 and then Acronis Home, and Acronis 2010 and when I tried to restore from the CD after a failure on my HP Pavillion G60-120US running Windows Vista Home the restore started and within a few minutes the computer power was shut off leaving my computer as a paper weight and no longer bootable.
Any ideas as to why this happened? I liked the acronis interface but after two occasions of this happening I am a little gun shy to depend on it again.
Thank you for a great post of how acronis is supposed to work….
Hi Gary,
Unfortunately I’m not really an Acronis expert – I just used it when my machine went belly up and it worked great, so thought I’d share it with my readers 🙂
Have you tried using the Acronis boot up media, so it boots straight into Acronis rather than your OS:
http://www.acronis.com/company/inpress/2007/03-15-boot-loader-2.html
Hi Dan,
Yes, I used the boot up media and booted up from the restore media CD made from within Acronis. I dont recall if I used the quiet no acpi mode or not and not sure how I would tell if that is the problem or not. I have used it sucessfully on my two home desktop computers to do restorations when things went bad but with this HP notebook it shuts the powers off to the computer just a few minutes into the recovery. This leaves the computer in an unbootable state with no chance to recover my data or Operating system after having destroyed the partition giving the blue screen of death. There is some incompatibility with the standard windows Vista HP notebook which I would like to remedy to keep being able to depend on Acronis. The tough part of it is testing it since it isnt fun restoring everything from scratch.
Gary
Hi Gary,
If it keeps powering off, maybe it’s an issue with the laptop over heating rather than Acronis?
If you haven’t already done so, you’d probably best getting in touch with Acronis tech support and see if they’ve ever come across anything similar.
Thanks Dan,
Well, it’s definately not an overheating problem because I can start it right back up with the F key to use the partitioned D: drive to restore the system OS. I guess I can give Acronis tech support a try but from what I have been reading on the blogs their Tech support leaves a lot to be desired. Maybe a few new IT techs that needed to learn the product or a turnover in personnel. I do know I am not going to try Acronis again until I get some kind of an answer on the solution or what causes it unless I have an alternate method of disaster recovery. It wouldnt be so bad if it failed to restore but it destroys the bootable OS leaving a bricked computer until the partition and MBR are restored with the recovery sector of HP recovery and I hate having to rip out all the bloat afterwards and reinstall everything.
Thanks again. You have a very nice online Blog. It impressed me with the presentation and the attention to detail.
No problem Gary, glad you like the blog 🙂
Good look with your problem, let us know if you manage to find a solution.
Is the backupfile .rar or another compressed file?:) And if… How much will a backup of 100 gb fill?:)
Hope you can help me;)
Sincerely
Kasper
Good question!
It stores the backups as .tib files, which I’m guessing is a custom filetype the use, so it’s not .tar, .rar or .zip.
As for compression, I honestly have no idea as I’m using incremental backups and keeping a few different restore points so it’s hard to tell exactly how much compression is taking place, if any. So that may be a question you would be best off asking their support team.