How To Make A Full PC Backup And Restore After Hard Drive Failure
Wow, that’s a bit of a long title isn’t it. I wonder if the search engines will like it? At least it’s nice and descriptive!
This post is going to be another of my free “How To” guides, but this time I’m not going to be showing you anything Website, or Internet Marketing related. I’m going to show you how to do something everyone with a computer should do at some point – get a full backup of your computer!
I don’t just mean important files and your favourite holiday snaps, I mean a backup of EVERYTHING. Program files, Windows, System Files/Folders, hard drive partitions and so on. If you have a backup of absolutely everything on your computer, you are covered in the event of a hard drive failure and can be back up and running as if nothing has happened in a matter of minutes.
I haven’t just thought of this subject off the top of my head, I had a hard drive failure last week so whilst I did the backup/restore procedure I took some pictures so I could show you all how to make a full computer backup, and then restore it on a new drive if things go bad. Here’s the story.
I was happily working away one day, when suddenly the computer stopped responding. I had no choice but to do a hard power down. (Turn it off and on again!)
During the boot process, I was shown an error message saying that one of the hard drives installed on the computer was failing, and I should get a backup of everything ASAP.
So as soon as I saw that message, I booted up and generated a full backup using Acronis True Image Home – and I’m not just doing a sly bit of product placement here, I do actually use the software I’m recommending :-0
**Just a side point for any techie’s reading before you try and trip me up – the system has 2 drives in a RAID 0 setup, and 1 of the drives was in the process of failing, it hadn’t totally given up the ghost, hence I was able to boot up**
Don’t worry if the above paragraph goes over your head, it’s not important!
Of course if you run a backup, you need somewhere to store that backup. There’s no point running a backup and then saving it on the drive that is failing. So you really need another drive to store your backups on, I personally use an external USB hard drive. They are dirt cheap at the moment so there’s no excuse not to have one.
I flew through that section a bit, so here’s how to create a full system backup in some easy to manage steps:
*Before I start, I should point out that I’m running Windows Vista Home Edition. So if you are running XP home, professional, or have a MAC then the screens may look slightly different from how the appear on here*
1. Plug in your external USB hard drive (ignore this step if you are using an internal drive)
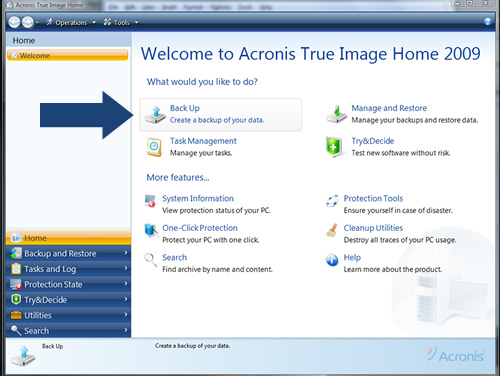
2. Open up Acronis True Image Home (15 day free trial available)
3. Click on the “Backup” Icon
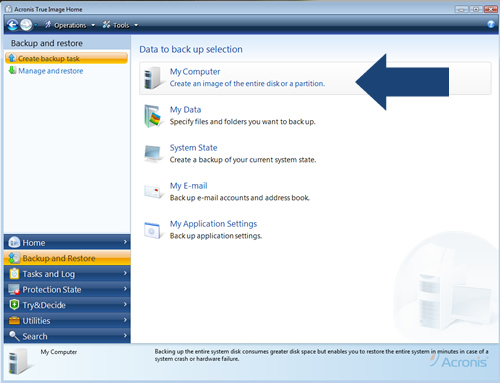
4. Click on the “My Computer” icon to create a backup of the entire disk or partition
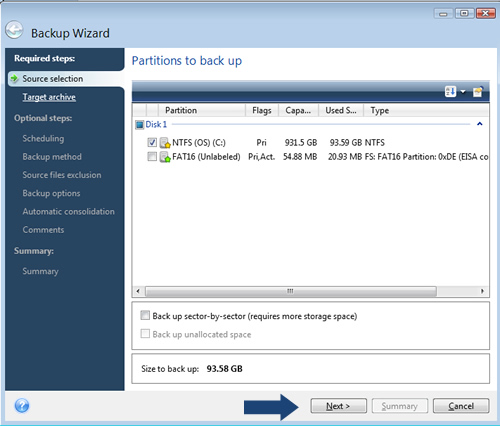
5. Select the disk you would like to make a backup of and click “Next”
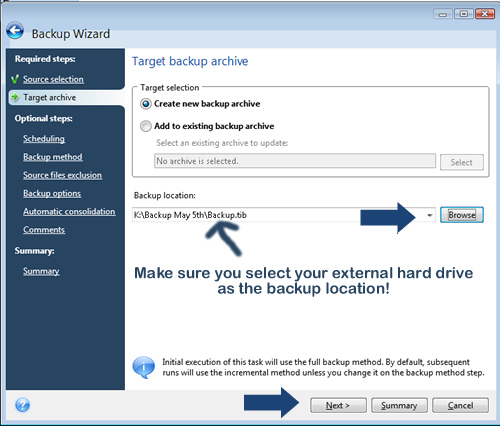
6. As this is your 1st backup, select the “Create new backup archive” option, and then click on the “Browse” button to locate your external drive. When you have selected a location to save the backup to (your external hard drive), click on “Next”
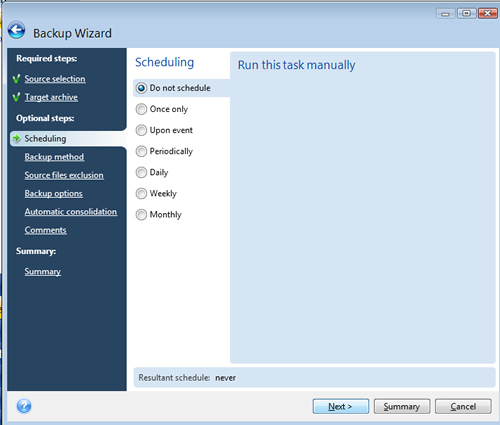
7. You will then be asked if you’d like to schedule the backup, at this time we want to create the back up right away, so select “Do not schedule”, but it’s worth remembering you can use the program to make an automated backup for you on a daily, or weekly basis.
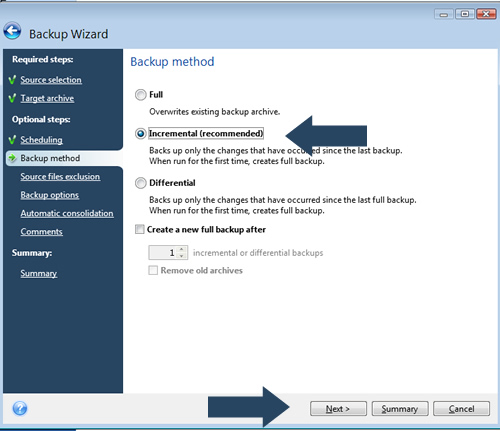
8. Next you are asked to select the backup method, as this is your first backup, you can select “Incremental”. This will create a full backup if it’s your 1st time (don’t be nervous), or if you are adding to an existing backup it will only backup the files that have changed since your last backup.
9. You can then choose to exclude certain files from the backup, this includes hidden files, system files, or any other filenames that you specify using custom criteria. As we want to backup absolutely everything, leave the boxes unchecked and click on “Next”
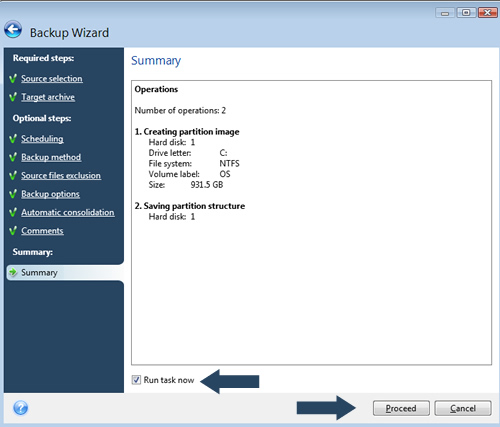
10. The next few steps can all be left as they are. So keep clicking “Next” until you get to the summary screen.
11. Make sure the “Run task now” box is checked, and then click on “Proceed”
12. You will then see a status bar showing you the progress of your backup. When the backup generation is complete, a confirmation will appear on screen and you can unplug your external hard drive, safe in the knowledge you have a full backup incase of a system, or hardware failure.
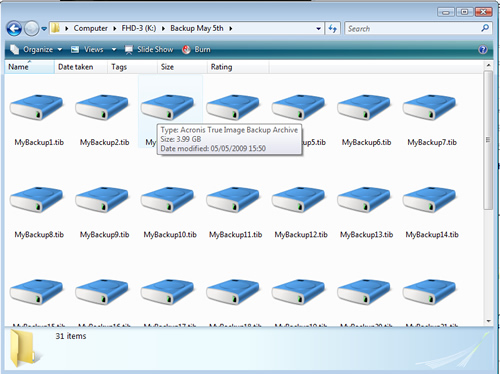
If you want to confirm everything has been backed up correctly, just open up your external drive and locate where you saved the backup. You should then be able to see your backup archives in all their glory!
So that’s the backup out of the way, even if you don’t think a system failure or hard drive combustion (can a hard drive combust?) will ever happen to you, I’d urge you all to make a full backup of your system! It only takes a few minutes to start the backup process, and it will save you LOTS of hassle if your computer goes belly up like mine did. With a full system backup you can restore everything to exactly how it was before a crash, you don’t need to reinstall any programs or operating systems!
Anyway, back to my story. If you have a short attention span, here’s where we are at:
One of my hard drives failed, so I made a full system backup onto an external hard drive.
The next step was to replace the faulty drive.
As I had a RAID 0 setup, which in very basic terms is a bit like having 2 disks running as 1, doubling your disk space. The new disk would need to be a replica of the other disk – or so I was told!
So I decided that instead if replacing just the faulty hard drive, I would replace both of them with brand new drives, in the process I’d increase the disk space on the computer from 300GB to 1TB, hard drives are dirt cheap now so it seemed silly not to. A good UK supplier of all things hardware related is CCL Online, I get all of my computer “bits” from there. So if you are after a new external or internal drive I can highly recommend them.
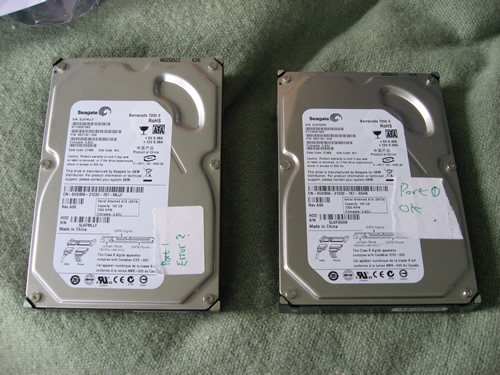
My new drives arrived the next day, so my next task was to remove the 2 old drives and replace them with the new ones. When I was taking them out, I made sure to make a note of which was the faulty drive so I could keep the remaining good drive for future use.
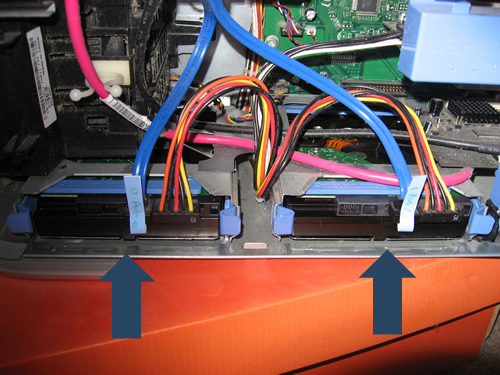
The actual installing of the new drives is pretty simple, although I suppose it all depends on your PC case. From the image below, you can see that my 2 drives are at the bottom of the case, and slide in and out. Yours may be positioned in a different place but the general idea is the same. You need to slide out the dock, and unscrew the old hard drive, replacing it with the new one. You’ll then have 2 connections going into the drive, the blue connector you can see on the image is the SATA cable that will go into your motherboard, and the wider, multi-coloured cable is the power cable, and this goes into the power supply.
**Top tip**
If one of your leads going into the hard drive is a wider, white/cream coloured cable then you will have an IDE hard drive, and not SATA, so bear that in mind if you are looking to replace a drive!
When you have ensured that your new drives are in place, you can turn on your computer. This next step depends on your computer setup, but you may be able to see a screen showing you the drives that are installed on your computer. As you can see from the image below, both of my new drives appear:

There are then 2 ways to do the next step. If you think about it, you’ve now got a brand new drive installed, but the drive is clean, it has no data on it at all – not even an operating system.
So here are your 2 options:
1. Reinstall windows using your boot CD
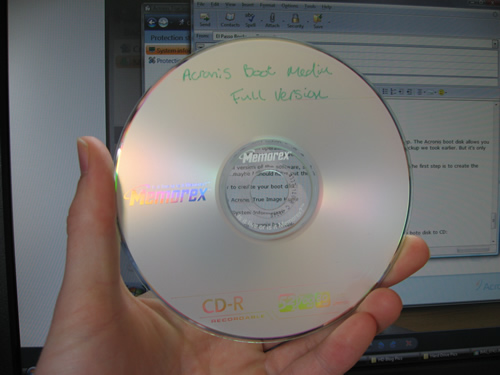
2. Use the Acronis boot disk to restore everything
Option 2 is the quickest option, as it allows you to skip the reinstall windows step. The Acronis boot disk allows you to boot up, without an operating system, and restore your computer from the backup we took earlier. But it’s only available if you purchase the full version of the software, not the 15 day trial.
I own the full version of the software, so I’ll show you how to use the boot disk. The first step is to create the rescue disk..maybe I should have put this further up in the article 🙂
Here’s how to create your Acronis boot disk:
1. Open up Acronis True Image Home
2. Click on “System Information”
3. Click on “Create Acronis bootable media”
Go through the Wizard clicking “Next” when prompted, and you can then burn the boot disk to CD (or DVD):
You should now have either your Acronis rescue boot disk, or your Windows boot disk ready to go.
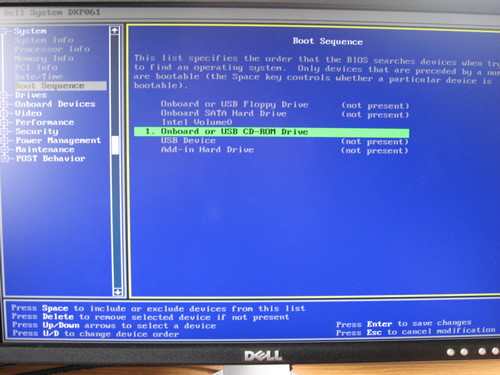
So the next thing you need to do is go into the BIOS and change the primary boot device to your CD/DVD drive, this will allow us to boot using the CD.
The way to do this will vary depending on the BIOS your are using, I’m using a Dell Dimension 9200 Desktop PC with the DXP061 BIOS…at least that’s what it said on the screen 🙂
To get into the BIOS on a Dell PC, power up the PC and keep tapping the F2 key until the blue screen appears.
When the blue screen appears, use the arrow keys on your keyboard to go down to the “Boot Sequence” option, push “Enter” on your keyboard, then move down to “Onboard or USB CD-ROM Drive” and push the space bar on your keyboard to set it as the primary boot device. You can then insert your CD (Windows or the Acronis boot CD), save the changes and then exit.
**Top Tip**
Before changing the order of the boot sequence, make a note of the old boot sequence then you can easily change it back when we are done!
When the computer reboots, it will boot using the CD you just entered in the drive. If you are reinstalling Windows go through the installation process to do a clean install, once installed, you can download the free 15 day trial of Acronis True image home. If you open it up we can then restore the backup we took earlier, as shown below.
Using the Acronis boot disk means we can skip the above step, and get straight down to restoring our backup.
To restore the backup using Acronis True Image Home 2009:
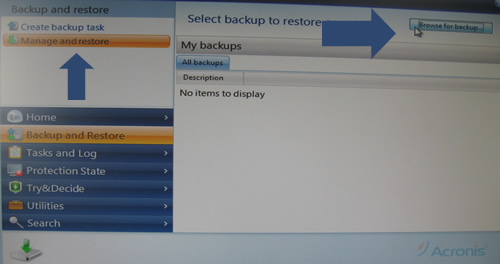
1. Click on “Backup and Restore”
2. Click on “Manage and Restore”
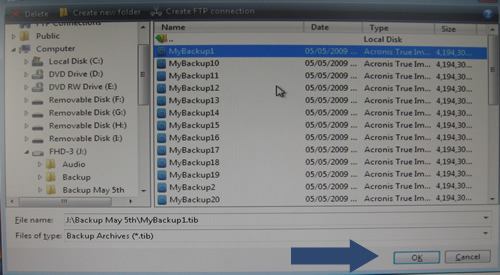
3. Click on the “Browse” button to locate the backup we saved on our external drive
4. When you’ve found the backup, click on one of the archives and click on “OK”
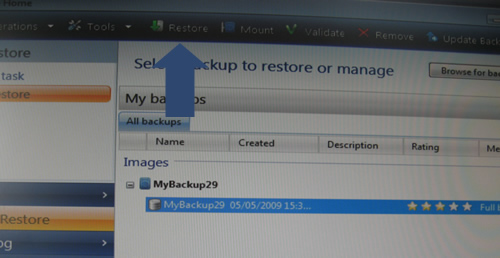
5. You’ll then see a summary of the backup, click on the backup and then click on the “Restore” icon towards the top of the page. Apologies for the quality of these pictures by the way, they were taken using my digital camera as I was doing the backup of my own PC!
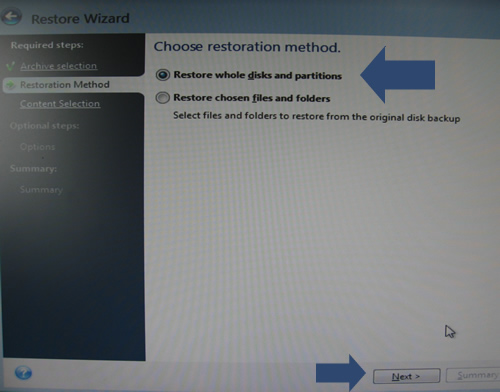
6. You can then choose the restoration method, you can either restore individual files and folders, or you can do a full restore. This restores your computer back to the exact state it was in when you took the backup, this includes absolutely everything!
Select “Restore whole disks and partitions” and click on Next.
8. The next step asks us where we’d like to restore the data to, we need to select the new drive (or drives) that we have just installed. Select the new drive and click on Next.
If you have chosen to go down the Windows reinstall route, you may see a warning saying that the drive contains useful data, and restoring the backup will delete that data. If the message appears, click on “OK”.
You will then be shown a summary of the actions that will be taken, click on “Proceed”.
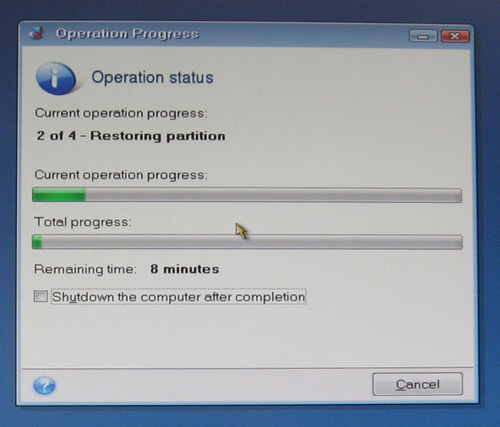
Your computer will then reboot and the restore process will begin, you’ll be able to see a dialog box showing you the progress of the restoration.
When this is complete, your computer should boot back up as normal and will be in the same state it was when you took the backup, but this time you’ll be running on a new hard drive and not the old faulty one 🙂
**Top Tip**
Remember to go back into your BIOS and set the boot sequence back to normal, this will ensure you don’t keep booting from the CD each time you turn on your computer!
So, in a nutshell, that’s how you make a full system backup of your computer, and how you restore it. It’s a very simple task as long as you are using Acronis True Image Home, there is a 15 day free trial but I purchased the full version, it’s worth it just to be able to create the rescue boot disk…
But I’m not done yet.
This next step might not apply to you, but I’ve got some screenshots so I may as well use them 🙂
My computer was now restored to it’s old state, Windows Vista home was running as normal, and all of my installed programs were intact, but I did have one small problem.
As the new hard drives I had installed had a larger capacity than the old drives I removed, I needed to resize the partition so I could use the new space I had gained from changing the drives. When I restored using True Image home, it restores a full image of the old hard drive, including the drive size.
So I needed to resize the partition.
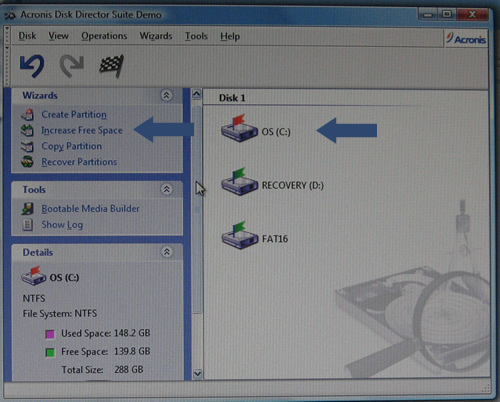
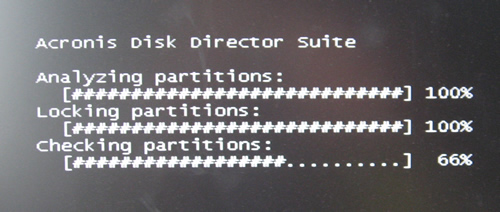
Normally doing this would mean a loss of data, but luckily I found some more Acronis software to use. I used the Acronis Disk Director suite, to quickly and easily increase the size of the partition, without losing any of the data I had just restored.
To increase the size of a hard drive partition, without losing any data:
1. Open up Acronis Disk Director Suite
2. Click on the partition size you want to increase
3. Click on the “Increase free space” icon
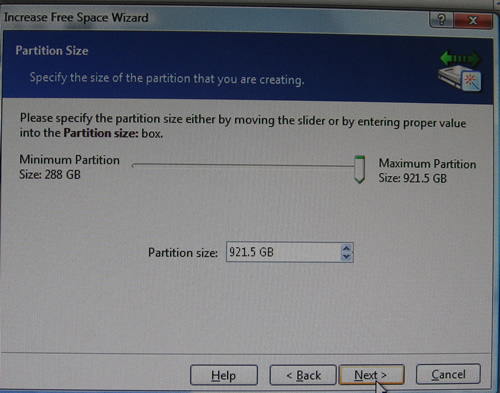
You will then be presented with an easy to use Wizard, go through the wizard until you get to the screen below, this then allows you to resize the partition. You can either take the space from another partition, or you can use the un-used space on the drive. (This is what I did)
When you have gone through the Wizard, you’ll see a confirmation on screen of the tasks that will be undertaken. When you are happy with this, click on the “Commit” button, your computer will then reboot and the changes will be made.
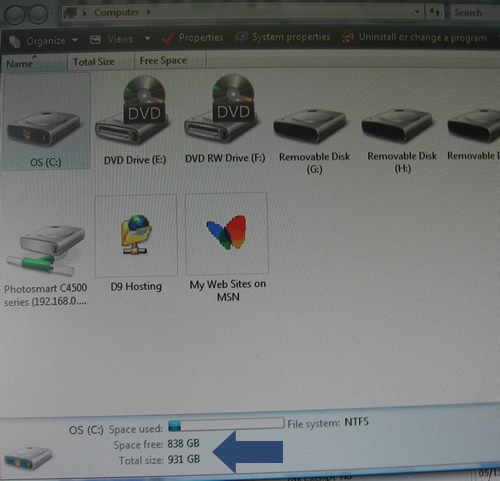
When you reboot, and go into “My Computer” you should be able to see that the size of the disk has been changed, and the software has done it’s job correctly 🙂
And there you have it, what started out as a simple blog post has morphed in what seems to have been one of my longest posts ever. I should really have turned it into an eBook…maybe I still could, but I think it should prove to be a very useful free resource. If something like this existed when my hard drive died it would have saved me a lot of research time, so hopefully it will help someone out there do the same.
So thanks for reading, and let me know if you have any comments or questions.
*Update*
You’ve probably already guessed that the links to the software I used ARE affiliate links…I need to get something out of the hours of typing don’t I? 😉
But when I signed up to the affiliate program, they did send me a list of coupon codes that can be used against all Acronis products. I don’t know if they will keep sending me new coupons each month, as the coupons I have at present are for May 2009 only, so I’ve listed them all in a section on the blog, and I’ll update it with more Acronis coupon codes if and when I get them.
Thanks for reading,
Dan
Acronis Coupon Codes For May 2009
Filed under: Acronis Discount Coupons
Below you can find a list of discount coupons that can be used against Acronis products during the month of May 2009.
All the codes must be entered during checkout, and will give you a number of discounts. You can find all the details below:
*The two products I used in the “How to backup your PC” blog post are the first 2 products in the list – True Image Home and the Disk Director Suite.
Acronis Disk Director Suite 10.0
Coupon Code: 1ZK-C4M-XK2
Discount: 15%
Click here to use the Disk Director Suite coupon
Acronis True Image Home 2009
Coupon Code: GDH-6C7-BB9
Discount: 15%
Click here to use the True Image Home coupon
Acronis True Image Echo Server for Windows
Coupon Code: CC2-WW3-U2C
Discount: 5%
Click here to use the True Image Echo Server for Windows coupon
Acronis Migrate Easy 7.0
Coupon Code: BNZ-FPS-Q3P
Discount: 15%
Click here to use the Migrate Easy coupon
Acronis True Image Echo Workstation
Coupon Code: JWY-GAV-12S
Discount: 5%Click here to use the True Image Each Workstation coupon
Acronis Disk Director Server 10.0
Coupon Code: C3H-24D-DVR
Click here to use the Disk Director Server coupon
Acronis True Image Echo Server for Linux
Coupon Code: RXN-HKJ-43P
Click here to use the True Image Echo Server for Linux coupon
Acronis True Image Echo Enterprise Server
Coupon Code: R9K-3FV-PCK
Click here to use the True Image Echo Enterprise Server coupon
Acronis True Image for Microsoft Windows Small Business Server
Coupon Code: 3LF-7SM-5HC
Click here to use the True Image For Windows Small Business Server coupon
Acronis Snap Deploy 3.0 for Servers
Coupon Code: REB-RPF-U1W
Click here to use the Snap Deploy For Servers coupon
Acronis Recovery for MS SQL Server
Coupon Code: B6Z-SRU-6CV
Discount: 5%
Click here to use the Recovery Tool For MS SQL Servers coupon
All of the above coupons are correct at the time of publishing, you can find a full list of coupons by visiting the Acronis Discount Coupons category.


